
View Our Recent Work:

For most private yachts, the right AIS upgrade is a Class B+ transponder unless USCG carriage rules or heavy commercial traffic require Class A. The single detail that determines whether that upgrade actually works is antenna placement paired with correct MMSI programming, and both are worth handing to a professional installer rather than tackling on a Saturday afternoon.
TL;DR:
- Upgrading to a Class B+ transponder is usually sufficient for private yachts unless USCG rules or heavy commercial traffic demand a Class A unit.
- Correct antenna placement, high-quality cabling, and precise MMSI programming are critical for a reliable AIS system and should be handled by professionals.
- Installing the AIS involves a dedicated external GPS antenna, appropriate wiring at a separate breaker, and careful configuration of data protocols like NMEA 0183 or NMEA 2000.
- Verification of proper operation requires dockside testing, sensor checks, and external confirmation from nearby vessels or VTS stations before leaving port.
- Costs can range from a single day for sharing an existing antenna with a B+ unit to several days for a full Class A upgrade with mast work and network conversion.
Table of Contents
- What an AIS Upgrade Actually Includes
- Class A vs Class B: Which One Does Your Yacht Actually Need?
- Installation Checklist: Getting the Details Right
- Commissioning: How to Confirm the Upgrade Actually Works
- What an AIS Upgrade Costs and How Long It Takes
- Overview: What Owners Should Expect From a Real Installation
- Get Your AIS Upgrade Done Right the First Time
- Sources
What an AIS Upgrade Actually Includes
An AIS upgrade is rarely just swapping a black box. It’s a small system project involving a transponder, an antenna path, position and heading sensors, wiring, and a configuration step that has legal weight.
At the center sits the transponder itself, available in Class A, Class B, or the newer Class B+ tier. Each transmits your vessel’s identity, position, and course to nearby ships and shore stations, and each receives the same from everyone else. That transmit function is what separates a transponder from a receiver-only AIS unit. A receiver shows you the traffic around you but keeps your own yacht invisible on other bridges, which defeats half the purpose of the technology in a crowded inlet or shipping channel.
A complete upgrade typically involves:
- A Class A, B, or B+ transponder matched to your vessel’s use case
- A dedicated AIS antenna or a marine-grade active splitter sharing an existing VHF antenna
- An external GPS antenna with a clear view of the sky
- Power wiring on its own breaker, plus data cabling to your chartplotter
- MMSI programming performed correctly and documented
Connectivity is where a lot of otherwise good installs go sideways. Modern boats increasingly run an NMEA 2000 backbone, which simplifies plug-and-play sensor sharing across multiple displays. Older networks rely on NMEA 0183, and AIS specifically needs that connection running at 38,400 baud, a faster rate than most other 0183 devices use. Every unit sold in the United States must carry FCC certification and, where Class A applies, USCG type approval. Skip that check and you risk buying gear you can’t legally operate.
Class A vs Class B: Which One Does Your Yacht Actually Need?
Regulation decides this one more often than preference does. Class A carriage is mandatory for self-propelled commercial vessels 65 feet and longer, vessels certificated to carry more than 150 passengers, and towing vessels 26 feet or longer with over 600 horsepower, according to U.S. Coast Guard AIS requirements. If your yacht doesn’t fall into one of those categories, you’re free to choose based on how you actually use the boat.
The technical gap between the two classes is bigger than most owners expect:
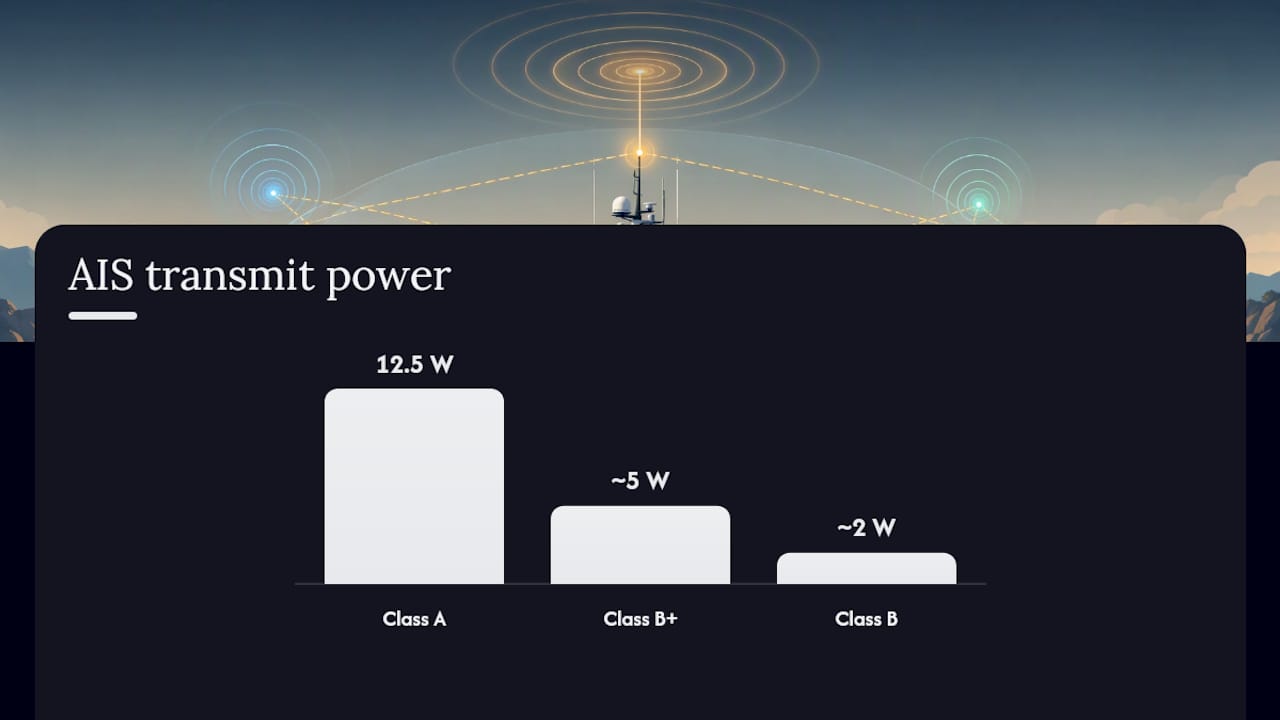
- Class A transmits at 12.5 watts using SOTDMA, reports position every few seconds at cruising speed, and requires a minimum keyboard display along with sensor inputs like heading and rate of turn.
- Class B+ also uses SOTDMA but at roughly 5 watts, giving better visibility than older units while staying simpler to install.
- Older Class B units use CS-TDMA at about 2 watts with slower, lower-priority reporting, a design compromise from years ago that newer B+ hardware has largely made obsolete.
These differences in transmit power and reporting frequency come straight from the Coast Guard’s own AIS class comparison, and they matter most in busy anchorages or shipping lanes where being seen a few seconds sooner changes a captain’s decision.
For an owner running a private yacht through South Florida’s traffic without a commercial carriage requirement, Class B+ is usually the sensible landing spot, according to marine electronics installers writing on the choice between AIS classes. A receiver-only unit can make sense on a smaller boat that just wants situational awareness, but on anything large enough to matter to a container ship’s watch officer, transmitting your own position is the whole point.
Installation Checklist: Getting the Details Right
Get these steps in order and most of the headaches disappear before they start.
- Choose the antenna path first. A dedicated AIS antenna mounted as high as practical gives the cleanest signal. If you’re sharing your VHF antenna, use a quality active splitter, never a passive one, because passive splitters bleed signal and quietly cripple your range.
- Mount an external GPS antenna with an unobstructed view of the sky, and let the transponder’s own GPS serve as the primary position source rather than pulling from another instrument.
- Wire the unit to its own fused breaker. Don’t piggyback AIS power onto an existing circuit, and keep the antenna cable and wiring at least a meter or two from your compass to avoid deviation.
- Pick your data protocol deliberately. NMEA 2000 is the simpler path on a modern network. If you’re stuck with NMEA 0183, confirm the AIS output runs at 38,400 baud, and never feed the same chartplotter from both an 0183 high-speed port and an N2K connection for the same data. That’s a fast route to duplicate targets and a confused display.
- Program the MMSI carefully. In the United States, this should be handled by an authorized installer or dealer under FCC rules, since many units make the number difficult to change after the fact.
- Log everything. Serial numbers, MMSI, firmware version, and antenna location all belong in the vessel’s electronics file, not in someone’s memory.
Pro Tip: Map your entire data flow on paper before running a single wire. Knowing exactly which port feeds which display prevents the single most common AIS wiring mistake: two data paths quietly fighting each other on the same screen.
Commissioning: How to Confirm the Upgrade Actually Works
Installing the hardware is the easy half. Commissioning is where you find out whether it works in the real world, and skipping this step is how owners end up with a transponder that looks fine on the bench but goes dark once the boat leaves the dock.
Start with the unit’s built in self test, then verify that GPS, heading, and rate of turn inputs are all reading correctly, particularly on Class A installs where those sensor feeds are effectively mandatory. A dummy load RF test confirms the transmitter is putting out proper power before you ever key it up near other electronics.
From there:
- Confirm your own vessel’s target appears correctly on the chartplotter, with the right vessel name and MMSI showing rather than a blank or default label
- Double check the AIS port is set to 38,400 baud if you’re running NMEA 0183, and rule out any data loop between 0183 and NMEA 2000 feeding the same display
- Run a dockside test to confirm both transmit and receive functions before leaving the slip
- Take the boat underway and check reporting rate and range against nearby traffic
- Where practical, ask a local VTS station or a nearby vessel to confirm they can see you, since external verification is the only way to know your signal is actually reaching the outside world
Keep a written record of every test result. If you ever need to prove the system was working on a given date, that log is the only evidence that holds up.
What an AIS Upgrade Costs and How Long It Takes
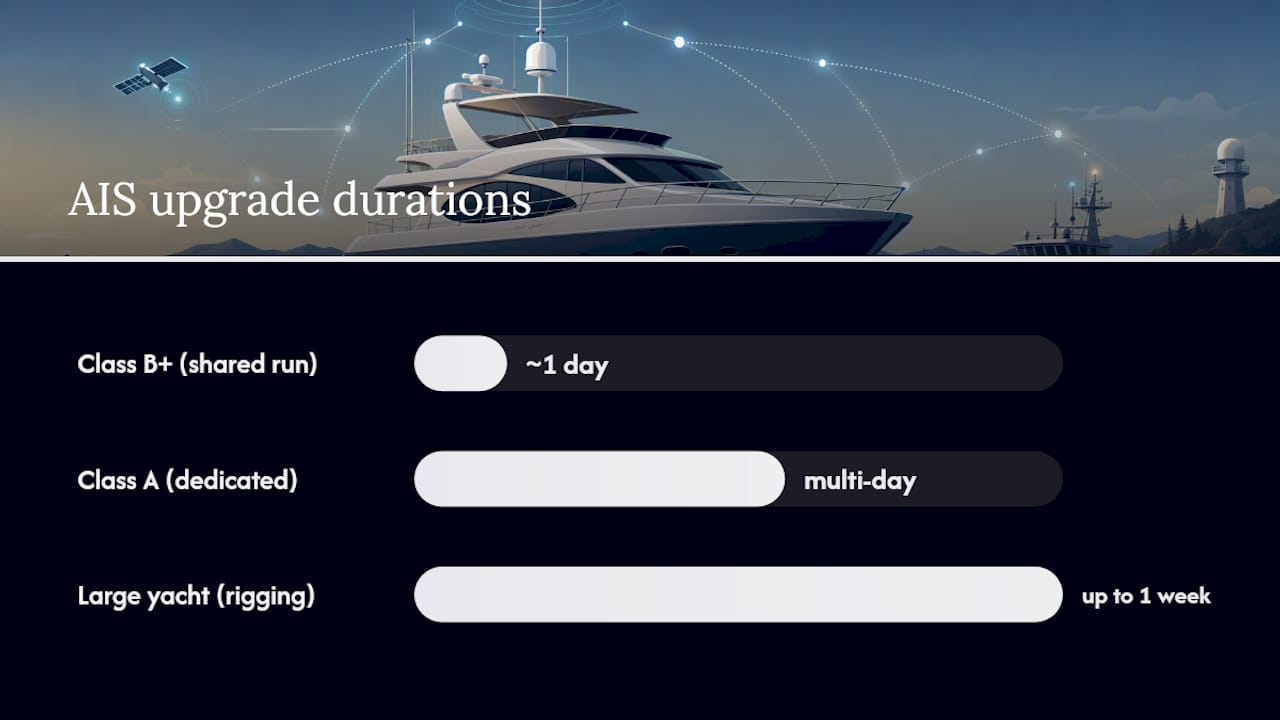
Budget varies more with the antenna work than with the transponder itself. A Class B+ unit with a straightforward install, sharing an existing antenna run, can sometimes wrap up in a single day. A Class A upgrade with a dedicated antenna, mast access, and an NMEA 2000 backbone conversion is a multi-day job, and on a larger yacht it can stretch toward a week once rigging and calibration are factored in.
The line items that push a quote higher rarely show up in the initial estimate:
- Corroded coax discovered once the old antenna cable is pulled
- A VHF radio that needs replacing to support a clean active splitter setup
- Labor premiums for mast access, especially on a stick that requires a bosun’s chair or a lift
- Calibration and dockside/underway testing fees on top of the install itself
Before you buy anything, confirm the USCG type approval and FCC certification numbers on the specific model you’re considering. Returning gear that turns out to be the wrong class for your vessel costs more in delay than it ever saves in sticker price.
Overview: What Owners Should Expect From a Real Installation
Most AIS upgrades that go wrong don’t fail because of bad hardware. They fail because of a rushed antenna run or a MMSI number entered under pressure at the dock. Owners who’ve been through a full nav electronics refit tend to bring in a professional the second the job touches mastwork or an NMEA 2000 backbone, and that instinct is usually correct.
A crew with real experience in navigation electronics, mastwork, and refit coordination catches the small things: the splitter that’s actually passive, the GPS antenna shadowed by a radar dome, the MMSI that got typed wrong the first time. That’s the value a shop brings that a manual alone doesn’t.
— Jason
Get Your AIS Upgrade Done Right the First Time
A professional AIS upgrade service handles the parts of an AIS upgrade that go wrong most often: antenna siting, mastwork, splitter selection, NMEA wiring, and MMSI programming, all coordinated by a crew that treats your electronics refit as part of the whole boat rather than an isolated box swap.

Before reaching out for a quote, have a few things ready: your vessel’s length and intended use (private cruising versus commercial carriage), your current MMSI if one is already assigned, a list of your existing electronics and chartplotter model, and a rough timeline for when you need the boat back in the water. That short list alone saves a round trip of phone calls.
If the AIS work is part of a bigger push, whether that’s a navigation upgrade or a broader refit project, a network of Florida yacht specialists can scope the whole job at once instead of piecing it together boat yard by boat yard. Reach out through the navigation upgrades page to get a quote started and a technician scheduled.
Recommended
Text or Call 954-330-9653 Schedule Appointment
Mazza Marine Yacht Services & Refit

Fiberglass Upgrades and Damage Repair

Premium Yacht Paint/ Faux Teak

Fishing: Custom Rods, Reels,Tackle

Electrical, Electronics and Navigation

Paint, Hull and Gelcoat

Teak Decks, Wood Cabinets, Carpentry

Canvas, Enclosures and Upholstery

Mechanical, Repower and Running Gear

Plumbing, Bilge and Thru-Hulls

Welding and Custom Fabrication

Interior Refit And Past Work
Get your yacht value Estimate
"*" indicates required fields