
View Our Recent Work:

Run your powered exhaust blower for several minutes before you ever hit the starter, every single time. That single habit, combined with ducting that actually meets minimum size and placement rules, closes the gap between a boat that vents explosive vapor safely and one that doesn’t. If your compartment volumes have changed, your ducts kink, or you’re unsure what you’re looking at, this is a job for a marine service, not a weekend guess.
TL;DR:
- Proper duct sizing requires a minimum of 2.5 inches in diameter, and duct runs should be supported every 12 to 18 inches to prevent sagging.
- The blower must run for at least four minutes before engine start, and clearance checks should be performed on shore power and battery power to ensure proper airflow.
- Retrofitting often involves routing around existing structures, increasing duct length and resistance, which may require larger blowers or careful planning.
- Installation must follow ABYC E-9 wiring standards, mount blowers above bilge water, and include clear labeling and inspection ports for future maintenance.
- A documented, correctly sized ventilation system significantly reduces fire and explosion risks, and inspectors or insurers look for proper ducting, labels, and maintenance logs.
Table of Contents
- What Should You Check Before Starting a Bilge Ventilation Upgrade?
- Natural Vents, Powered Blowers, and Choosing the Right Ducting
- How Do You Size Ducts and Blowers for USCG and ABYC Compliance?
- Installing a Compliant Bilge Ventilation System, Step by Step
- Keeping a Bilge Ventilation System Working Season After Season
- Beyond USCG: ABYC and International Ventilation Standards
- Upgrading an Existing Bilge Ventilation System: Retrofit Challenges
- Avoiding Ignition Risks During Bilge Ventilation Installation
- What Does a Bilge Ventilation Upgrade Typically Cost?
- How a Ventilation Upgrade Affects Vessel Safety and Insurance
- Mazza Marine’s Take: Where Bilge Ventilation Upgrades Go Wrong
- Get Your Bilge Ventilation Upgrade Done Right the First Time
- Where This Guide’s Standards Come From
- Sources
- FAQ
What Should You Check Before Starting a Bilge Ventilation Upgrade?
Before you buy a single fitting, you need real numbers. Guessing at compartment size is how owners end up with an undersized blower that technically runs but never clears the space fast enough to matter.
Start with net compartment volume, not the boat’s overall displacement figure. Measure the actual enclosed engine or fuel tank space, subtracting the volume taken up by the engine block, fuel tanks, and structural members. The USCG’s 46 CFR 182.460 standard ties air-change minutes directly to this net figure, so an inflated volume estimate throws off every calculation downstream.
From there, walk the boat with a notepad or your phone camera and record:
- Existing duct diameters, routing, and material (rigid PVC, flexible hose, or something improvised)
- Whether the boat has a remote or automatic engine starter, which triggers a mandatory powered ventilation system under 33 CFR 183.610
- Bilge water high points relative to duct openings, and distance from fuel fill or vent fittings
- Any existing warning labels, blower nameplate ratings, wiring condition, and whether the blower is even reachable for future service
That last point trips up more owners than you’d expect. A blower buried behind a fuel tank with no access panel is a blower nobody will ever inspect again.
Pro Tip: Photograph every duct run before you touch anything. When a refit crew opens up a compartment six months later, those photos save an hour of guesswork about where the old ducting actually went.
Natural Vents, Powered Blowers, and Choosing the Right Ducting
Natural ventilation, essentially open cowls that rely on airflow while underway, works fine on a moving boat with the right wind angle. It does almost nothing while you’re sitting at the dock, which is exactly when fuel vapor tends to pool. BoaterExam’s guidance on ventilation systems makes this point directly: natural systems are the weaker half of the equation precisely when you need protection most, at idle or shut down.
Powered blowers solve that problem, but only if they’re rated correctly. Every blower installed in a gasoline engine compartment needs to be ignition-protected, meaning it won’t produce a spark capable of igniting fuel vapor, and rated for continuous duty rather than intermittent use. Look for compliance markers referencing UL or AMCA testing on the nameplate.
For ducting itself:
- Rigid duct resists collapse and kinking better than flexible hose, especially on long horizontal runs
- Flexible duct earns its keep in tight, curved spaces where rigid pipe simply won’t bend
- Support straps every 12 to 18 inches keep flexible duct from sagging into bilge water over time
- Cowls and scoops need enough separation, at least a couple of feet where the layout allows, so exhaust air doesn’t get pulled straight back into the intake
Control options range from a simple manual toggle at the helm to a timer that forces the full run before the ignition circuit unlocks. Boats with remote starters generally need that interlock, since nobody’s standing at the helm counting minutes when the engine fires up automatically.
How Do You Size Ducts and Blowers for USCG and ABYC Compliance?
The math here isn’t complicated, and you don’t need an engineering degree to run it. ABYC H-2 provides the formula marine techs actually use: minimum duct area in square inches equals 5 times the natural log of your compartment volume in cubic feet divided by 5, or A = 5 ln(V/5).
Here’s a worked example for a typical 200 cubic foot engine compartment:
- Divide volume by 5: 200 ÷ 5 = 40
- Take the natural log of 40: approximately 3.69
- Multiply by 5: 3.69 × 5 ≈ 18.4 square inches of minimum aggregate duct area
That 18.4 square inches has to be split across your supply and exhaust ducts, with each duct meeting a nominal diameter of at least 2.5 inches under ABYC guidance, and terminal openings meeting the 3.0 square inch minimum set in the CFR tables. 46 CFR 182.460 separately requires specific air-change minutes scaled to compartment size, which is where blower CFM selection comes in. Undersized ducting chokes a properly rated blower just as badly as an undersized blower chokes properly sized ducts.
Statistic Callout: The 4-minute pre-start blower run isn’t a suggestion. It’s baked into 33 CFR 183.610, which requires a warning label posted at the ignition switch on every boat with an enclosed gasoline engine compartment.
Wiring needs to follow ABYC E-9 standards, and blowers must mount above normal bilge water level with nonsparking blades. Skip any of that and you’ve built a system that looks compliant but isn’t.
Installing a Compliant Bilge Ventilation System, Step by Step
Once you’ve got parts in hand, sequence matters. Rushing the wiring before the ducting is finalized is how owners end up re-pulling cable through a compartment they just closed up.
- Isolate battery power, ventilate the compartment manually, and gather your parts list, blower, duct, cowls, straps, and marine-grade wire before cutting anything.
- Route ducts above the highest expected bilge water line, keeping intake and exhaust runs separated by roughly 24 inches internally where the hull shape allows.
- Mount the blower above bilge water on anti-vibration isolators, wire it per ABYC E-9, and install a labeled helm switch within easy reach of the ignition.
- Apply the required warning label near the ignition switch, then run the blower at nominal voltage and time it against a clock, not a guess.
- Perform a sniff test with the compartment closed, confirm no recirculation between intake and exhaust cowls, and check that airflow direction matches the design.
- Log the installation date, part numbers, and any service notes in the vessel’s maintenance records.
Pro Tip: Run the blower test twice, once at dock power voltage and once on battery alone. A blower that clears the compartment fine on shore power can underperform on a tired battery, and that’s exactly the scenario where the 4-minute rule matters most.
Keeping a Bilge Ventilation System Working Season After Season
An upgrade installed correctly in January can fail quietly by summer if nobody checks it. Monthly visual inspections catch most problems before they become dangerous: look for debris blocking cowls, ducts sagging into bilge water, and any sign of chafe where hose meets a bulkhead.
Build a few habits into your routine:
- Check blower run time against the original spec at least once a season, since motors slow down as bearings wear
- Listen for unusual noise or vibration, which often signals a failing bearing or a loose mount
- Inspect electrical connections for corrosion, especially in bilges that see saltwater intrusion
- Re-test the sniff check any time you smell fuel, even faintly, after a normal blower cycle
If you ever smell gasoline after running the blower its full cycle, don’t start the engine. Ventilate further, shut off fuel supply valves if accessible, and call a marine technician rather than troubleshooting live near a fuel source. Environmental factors, wind direction, dock orientation, even how full the fuel tank is, can all change how quickly vapor clears, which is why the Boat-ed ventilation guidance still recommends a sensory check even after you’ve hit your timer. Any engine swap, generator addition, or major refit is also a trigger to re-run your sizing math, since compartment volume and vapor sources rarely stay the same after a refit.
Beyond USCG: ABYC and International Ventilation Standards
USCG regulations set the legal floor for US-registered gasoline boats, but ABYC H-2 goes further, covering installation details the federal code leaves general, like exact mounting orientation, wire gauge tied to run length, and blower selection charts matched to compartment size. Most reputable marine electricians and installers build to ABYC standards specifically because it’s the recognized benchmark insurers and surveyors check against during a pre-purchase or post-refit inspection.
International cruisers should know that ISO 9097 addresses ventilation for boats with gasoline engines in a similar spirit to ABYC H-2, though the specific formulas and terminology differ. If you’re planning to flag a vessel outside the US or sail it into waters governed by CE marking requirements, that distinction matters for compliance paperwork, not just safety.
One nuance ABYC flags that the CFR doesn’t emphasize: ventilation systems are designed to clear explosive vapor, not to cool an engine room. Owners running high-output gasoline engines or generators sometimes assume adequate ventilation also solves heat buildup. It doesn’t, and treating vapor clearance and thermal management as the same problem is a common, avoidable mistake. A boat that passes every ventilation check can still run hot if intake volume wasn’t sized with heat rejection in mind.
Upgrading an Existing Bilge Ventilation System: Retrofit Challenges
Retrofitting ventilation into a boat that already has interior finish work, wiring runs, and structural liners installed is a different job than building it into a bare hull. The ducting has to go somewhere, and on most production boats, that somewhere involves cutting through a liner or fiberglass stringer that wasn’t designed with future access in mind.
The most common retrofit obstacle is duct routing conflict, existing wire bundles, fuel lines, or plumbing already occupying the space where a duct run makes the most sense. Rerouting around those obstacles often means longer duct runs than the original design intended, which increases resistance and can require stepping up to a larger blower than the base calculation suggests.
Older boats also frequently have undersized or missing ducting entirely, especially vessels built before ABYC H-2’s duct-area formula became standard practice in the industry. In those cases, a retrofit isn’t really an upgrade so much as a first-time proper installation, and it should be treated with that level of scrutiny.
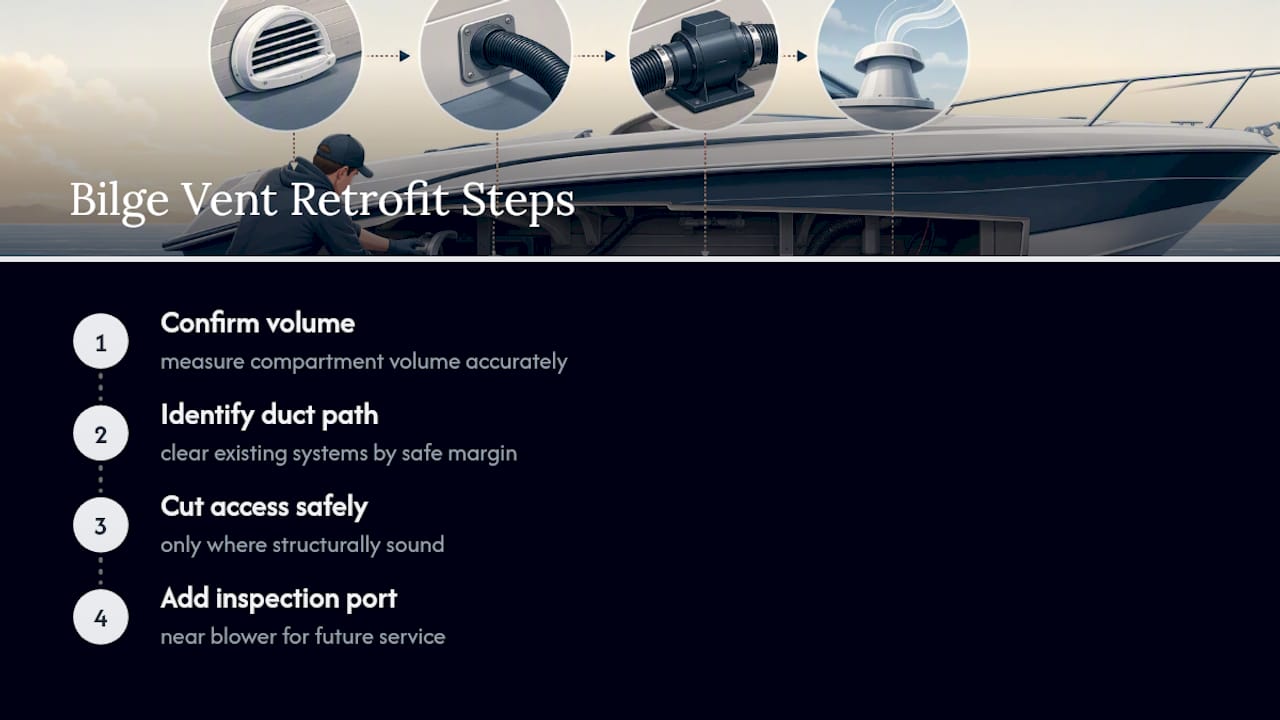
A practical retrofit sequence looks like this: confirm current compartment volume, identify a duct path that clears existing systems by a safe margin, cut access only where structurally sound, and always add an inspection port near any new blower mount so future service doesn’t require re-cutting the same access hole. Boats with teak decking or finished interior joinery need extra care here. A refit crew experienced with interior work can route ducting without tearing up finish material that took real craftsmanship to install in the first place.
Avoiding Ignition Risks During Bilge Ventilation Installation
The single biggest hazard during a ventilation upgrade isn’t the finished system, it’s the install itself, performed in a compartment that already has fuel vapor present. Any electrical work, drilling, or grinding near fuel lines or an open bilge needs the compartment fully ventilated and ideally gas-free before tools come out.
Disconnect the battery before running any wiring, and never assume a switch is off just because it looks off. Use non-sparking tools where the manual specifies, and confirm no open flame or smoking is happening anywhere near the work zone, obvious advice that gets ignored more often than it should on a hot afternoon.
Structural cutting for duct runs carries its own risk beyond ignition: cutting into a fuel tank baffle, a wiring harness, or a structural stringer by accident. Mark cut lines conservatively, and if there’s any doubt what’s behind a panel, stop and inspect with a borescope or mirror before committing a saw blade.
Once the new blower and wiring are in, test everything with the compartment open and accessible before closing up any access panels. A wiring fault caught with the panel off is a five-minute fix. The same fault discovered after the panel’s screwed down and glassed over is an afternoon of frustration, and sometimes a repeat of the same cutting risk you were trying to avoid the first time.
What Does a Bilge Ventilation Upgrade Typically Cost?
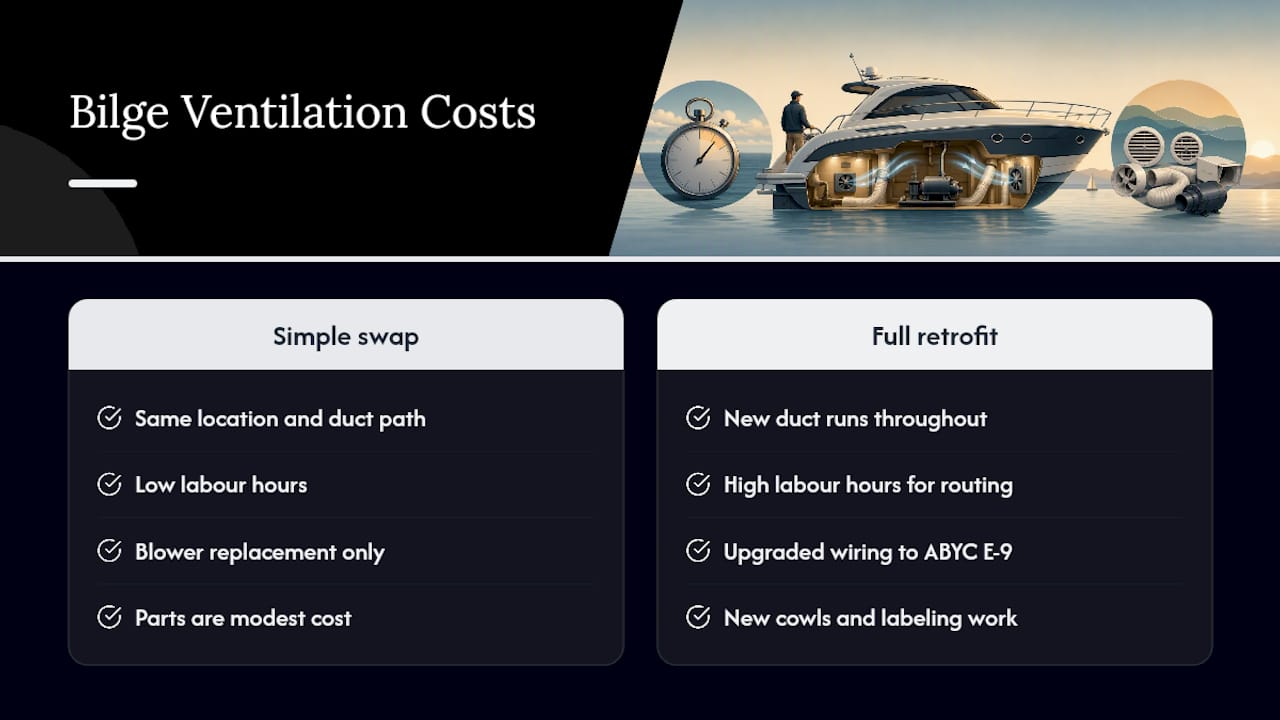
Cost on a bilge ventilation upgrade scales with two things: how much new ducting has to be routed, and whether the job involves cutting into existing structure or finish work. A straightforward blower swap, same location, same duct path, sits at the low end of the range. A full retrofit with new duct runs, upgraded wiring to ABYC E-9 spec, new cowls, and labeling work costs considerably more, simply because of the labor hours involved in routing and access.
Parts themselves are a smaller line item than most owners expect. A properly rated, ignition-protected blower and enough rigid or flexible duct to outfit a mid-size engine compartment isn’t the expensive part of this job. Labor is, particularly when access requires removing panels, sections of liner, or interior joinery to reach the compartment cleanly.
Boats with multiple gasoline sources, twin engines plus a generator, for instance, cost more to upgrade because each compartment needs its own sized system rather than one shared calculation. Older boats needing a first-time proper installation, rather than a simple swap, also run higher because there’s no existing duct path to reuse.
Budgeting realistically means asking for an assessment before assuming a number. A marine mechanical service that’s opened up your specific hull layout before can usually scope the job accurately in a single visit, which beats guessing based on a forum post about a different boat entirely.
How a Ventilation Upgrade Affects Vessel Safety and Insurance
A correctly sized and installed ventilation system does one job well: it keeps explosive vapor from accumulating to dangerous concentrations in an enclosed gasoline engine compartment. That’s not a marginal safety improvement, it’s the difference between a boat that meets the baseline legal standard and one that’s genuinely built to reduce fire and explosion risk.
Insurers pay attention to this during surveys, particularly pre-purchase surveys and periodic renewal inspections on older gasoline-powered boats. A surveyor who finds an undersized duct, a missing warning label, or a blower that doesn’t run the required cycle is flagging exactly the kind of deficiency that can affect a policy, sometimes triggering a request for corrective work before coverage renews or a claim gets fully honored.
Documentation matters here as much as the physical install. A logged upgrade date, parts list, and confirmation that the system meets ABYC H-2 sizing gives both a surveyor and a future buyer something concrete to check against, rather than taking an owner’s word for it. Boats that have changed hands with clean, documented ventilation records tend to move through survey faster, since there’s nothing left to question on that front.
Mazza Marine’s Take: Where Bilge Ventilation Upgrades Go Wrong
The mistakes we see most often are undersized blowers picked by eyeballing compartment size, duct runs kinked behind a fuel tank nobody wanted to move, and cowls mounted too close together, so exhaust just recirculates back into the intake. A professional install fixes routing, uses materials rated for the marine environment, and leaves you with a warranty and a paper trail a surveyor will actually accept. If wiring, structural cutting, or multiple gasoline sources are involved, call a marine service before you start cutting.
— Jason
Get Your Bilge Ventilation Upgrade Done Right the First Time
Professionals handle bilge ventilation upgrades by assessing first, then installing to spec, not to guesswork. A network of yacht experts sources correctly rated blowers, routes ducting to ABYC H-2 sizing, wires it to ABYC E-9 standards, and provides labeling and documentation a surveyor or insurer will accept.

If your boat’s showing warning signs already, faint fuel odor, a blower that’s slower than it used to be, or ducting nobody’s inspected in years, that’s not a wait-and-see situation. Check our guide on signs you need yacht repairs if you’re unsure whether it’s time to call. For anything urgent, our emergency repair service gets a technician looking at your compartment fast, no waiting weeks for a slot. Reach out to schedule an inspection and get a straight quote on what your specific boat actually needs.
Where This Guide’s Standards Come From
This guide draws on 33 CFR 183.610, 46 CFR 182.460, and ABYC H-2, along with practical guidance from BoatUS and BoaterExam. For vessel-specific questions, check your boat’s documentation and consult your cognizant Officer in Charge, Marine Inspection.
Sources
- 46 CFR § 182.460 – Ventilation of machinery spaces and fuel tank compartments. | Electronic Code of Federal Regulations (e-CFR)
- Required equipment – BoatUS Foundation study guide
- Boat Ventilation Systems Explained | BoaterExam
FAQ
How long should a bilge blower run before starting the engine?
Run the powered exhaust blower for at least 4 minutes before starting a gasoline engine, a requirement backed by the warning label mandated under 33 CFR 183.610.
What’s the minimum duct size for a bilge ventilation system?
ABYC H-2 calls for a nominal duct diameter of at least 2.5 inches, with terminal openings meeting a 3.0 square inch minimum under federal ventilation tables.
Is natural ventilation enough for a gasoline-powered boat?
Natural ventilation helps while underway but does little at the dock or at idle, which is why most gasoline-powered boats need a powered blower system to meet USCG requirements.
How do I know if my bilge ventilation upgrade needs a professional?
If the job involves structural cutting for duct access, wiring to ABYC E-9 standards, or a compartment with multiple gasoline sources, a marine service like Mazzamarine can scope and install it correctly the first time.
What happens if I smell gasoline after running the blower?
Don’t start the engine. Ventilate further, isolate fuel sources where accessible, and call a marine technician rather than troubleshooting near a fuel source yourself.
Recommended
Text or Call 954-330-9653 Schedule Appointment
Mazza Marine Yacht Services & Refit

Fiberglass Upgrades and Damage Repair

Premium Yacht Paint/ Faux Teak

Fishing: Custom Rods, Reels,Tackle

Electrical, Electronics and Navigation

Paint, Hull and Gelcoat

Teak Decks, Wood Cabinets, Carpentry

Canvas, Enclosures and Upholstery

Mechanical, Repower and Running Gear

Plumbing, Bilge and Thru-Hulls

Welding and Custom Fabrication

Interior Refit And Past Work
Get your yacht value Estimate
"*" indicates required fields