
View Our Recent Work:

Overview: Trace every fuel hose from tank to engine before you touch anything else, and stop the moment you catch a whiff of fuel or spot a wet fitting. Feel each hose along its full length for soft, spongy, or swollen spots, since those signal internal failure long before a hose looks bad from the outside. If nothing feels wrong and there’s no wetness or vapor, move to a primer-bulb check, a clear-jar bubble test, and a brief run under load. Any hint of fuel odor, chafe through the outer jacket, or a wet connection means you secure the compartment and call a marine technician rather than crank the engine.
That’s the whole job in miniature. The rest of this guide breaks down each step so you know exactly what “soft,” “chafed,” and “vapor tight” actually look and feel like on your own boat.
- Trace the hose route visually first, from tank to engine, before touching anything
- Feel every inch by hand: soft, spongy, or bulging sections mean replacement, not monitoring
- Run functional tests (primer bulb, clear jar, short load test) only after the visual and tactile checks come back clean
- Treat any fuel smell or wet fitting as a hard stop, not a “check it later”
Pro Tip: Keep your nose in the game. A sharp, sour, almost varnish-like smell in the bilge often shows up before any visible leak does, and it’s one of the earliest tells that a hose is permeating fuel through its own wall.
Key Takeaways
Fuel line failures are almost always preventable when owners combine a visual trace, a hands-on feel check, and basic functional tests before every season or extended trip.
| Point | Details |
|---|---|
| Trace before you touch | Follow the hose visually from tank to engine, checking every clamp and fitting along the way. |
| Feel is non-negotiable | Soft, spongy, or bulging sections mean internal failure even when the hose looks fine outside. |
| Test function, not just looks | Primer-bulb, clear-jar, and load tests reveal air leaks and restrictions visual checks miss. |
| Know the replacement triggers | Cracks, chafe-through, wetness, or fuel odor mean immediate replacement, no exceptions. |
| Call Mazzamarine for compliance work | Pressure testing, tank repairs, and fire-resistant hose sections belong to certified technicians. |
Table of Contents
- Tools and a Quick Pre-Check List Before You Start
- Step 1: Trace the Fuel Line Visually From Tank to Engine
- Step 2: Flex, Pinch, and Feel Every Hose by Hand
- Step 3: Run the Primer Bulb, Clear-Jar, and Load Tests
- Reading Hose Markings and Why Ethanol Changes the Math
- Definitive Signs a Hose Needs to Come Off the Boat
- Replacing a Hose Section Safely, and Where DIY Stops
- When to Stop and Call a Professional Technician
- What ABYC Standards Require and What a Yard Adds
- How Mazza Marine Handles Fuel System Work You Shouldn’t DIY
- Frequently Asked Questions
- Sources
Tools and a Quick Pre-Check List Before You Start
You don’t need a mechanic’s toolbox to inspect fuel lines properly, but you do need the right handful of items laid out before you start crawling into the engine room. Half of doing this safely is preparation, not technique.
Gear to have on hand:
- Nitrile gloves and eye protection
- A bright flashlight and an inspection mirror for tight corners
- Clean rags, a clear glass or jar, and a spray bottle of soapy water
- A spare length of USCG A1-rated hose and stainless hose clamps
- A basic screwdriver and wrench set
Safety items you shouldn’t skip:
- A fire extinguisher rated for fuel fires, positioned within reach
- A bucket and absorbent pads for any spillage
- Ventilation, whether that’s opening hatches or running a blower for several minutes before you start
Before you touch a single clamp, flip the battery switches off so nothing electrical can spark near fuel vapor, and let the compartment air out. Keep your phone charged and a buddy within earshot. If something goes sideways in a confined engine space, you want a second set of hands and a way to call for help immediately.
Pro Tip: Run the blower for a full five minutes before opening any fuel connection, even if you don’t smell anything. Vapor can pool in low spots without giving off an obvious odor at nose level.
Step 1: Trace the Fuel Line Visually From Tank to Engine
Start at the tank outlet and follow the line the whole way to the engine, checking every clamp, fitting, and connection point you pass. This is the single most overlooked part of yacht fuel system maintenance, mostly because it takes patience rather than skill, and rushing it defeats the purpose.
- Begin at the tank pickup and vent lines, then move through the fuel filter and primer bulb, ending at the engine inlet.
- Inspect every hose clamp along the way. It should sit on the barb itself, not slid back behind it where it does nothing.
- Check that hoses run in smooth curves, clear of sharp bends, moving parts, and anything that generates heat.
- Look closely at any point where a hose touches wood, fiberglass, or metal structure. Contact points are where chafe starts.
While you’re working your way down the line, watch for a few tells that separate a healthy system from one heading toward failure:
- Wetness or staining anywhere along the hose or at a fitting
- A sour, varnish-like odor lingering in the bilge, which often shows up before any visible leak
- Paint or gelcoat deterioration near a fitting, a sign fuel has been weeping slowly
- Cuts, rub marks, or shiny worn spots where a hose has been rubbing against structure
Snap a few photos of anything that looks questionable. A quick reference shot lets you track whether a suspect area is getting worse over the next few outings, and it gives a technician something concrete to look at if you end up calling one in. This kind of yacht fuel line inspection routine, done every season, catches problems while they’re still cheap to fix.
Step 2: Flex, Pinch, and Feel Every Hose by Hand
Your eyes will miss what your hands can catch. Internal liner failure is the sneaky one: a hose can look completely normal on the outside while the inner wall has already started collapsing or turning gummy, and that’s the kind of damage that causes a boat to stall offshore with zero warning.
Work your way down the same route you just traced, but this time, put your hands on every section:
- Flex each hose gently along its length, feeling for soft, spongy give or a section that seems collapsed compared to the rest
- Pinch small sections between your fingers; a healthy hose resists evenly, while a bad one feels lumpy or mushy on the inside
- Pay close attention right at the fittings and under the clamps, since cracking and crazing show up there first
- Check anything running near the exhaust or engine block for heat damage, which tends to make rubber brittle and prone to cracking
A hose that’s gone hard and brittle is just as much a failure as one that’s turned soft and gummy. Both extremes mean the compound has broken down, and neither one belongs on your boat anymore.
Pro Tip: If a hose cracks, splits, or starts seeping the moment you flex it, stop immediately and cut ignition power at the battery switch before doing anything else. Don’t try to finish the inspection with fuel actively weeping nearby.
Step 3: Run the Primer Bulb, Clear-Jar, and Load Tests
Once the visual and tactile checks come back clean, three functional tests confirm whether fuel is actually moving through the system the way it should. These steps catch air leaks and internal restrictions that a hose can hide even when it looks and feels fine.
- Primer-bulb test. Squeeze the primer bulb until it firms up completely. A bulb that never firms almost always points to an air leak somewhere upstream, usually at a loose fitting or a cracked pickup tube. If it firms up but then slowly goes soft again over a minute or two, the system is losing prime through a leak rather than pulling in air.
- Clear-jar or bubble test. Disconnect a downstream section of hose into a clear jar, or use a transparent inline section if your setup has one, then crank the engine briefly or squeeze the primer bulb again. Bubbles in the fuel stream mean air is entering the system somewhere between the tank and that point, which the BetterBoat DIY fuel line guide identifies as one of the most reliable ways to catch a problem that mimics an engine or carburetor fault.
- Soapy-water leak check. With the system pressurized within its normal safe operating range, spray a soapy-water solution on every joint and fitting. Persistent bubbles at a connection point mean fuel or vapor is escaping there, even if you can’t see or smell it directly.
- Controlled run under load. Only after confirming there’s no wetness, no odor, and no vapor concern, start the engine and briefly bring it up to a higher RPM. Stalling, hesitation, or a rough idle under load often points to a hose that’s collapsing internally under suction, restricting fuel flow right when the engine needs more of it.
Skip the load test entirely if you’ve picked up any hint of fuel vapor in an enclosed engine space. Ventilate the compartment fully and evacuate the area if the smell is strong. This isn’t a step to push through out of impatience.
Pro Tip: Do the clear-jar test with the engine off and the key in the “on” position if your setup allows an electric primer pump, rather than cranking the starter repeatedly. It’s easier on your battery and gives you a cleaner look at the fuel stream.
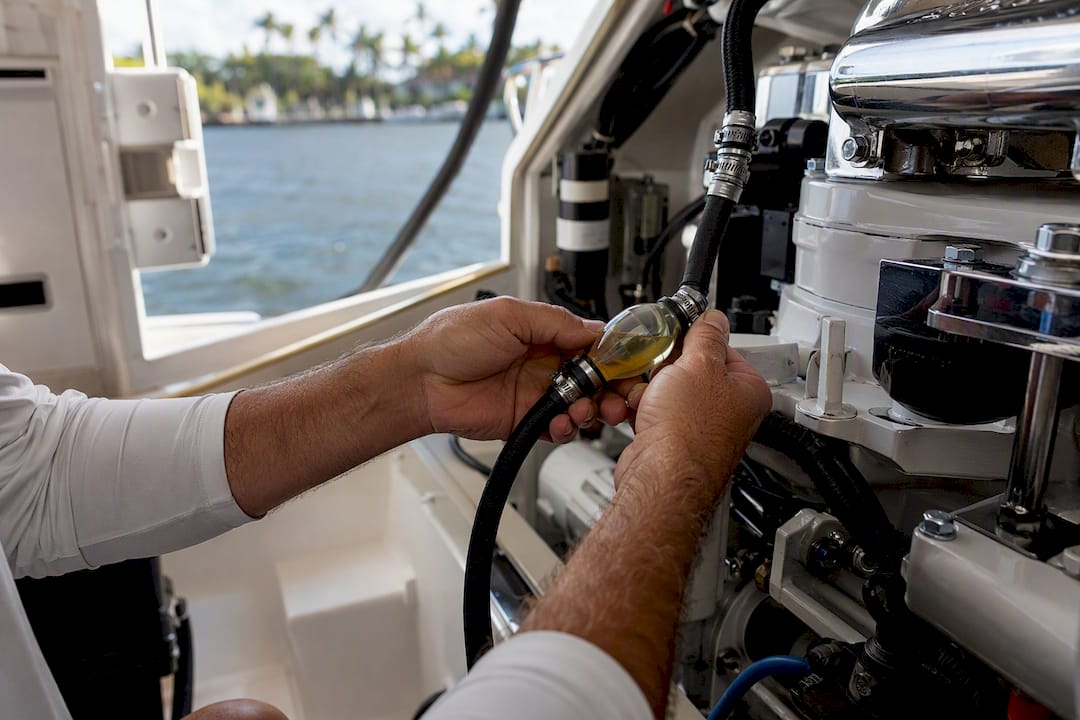
Marine repair specialists consistently point out that the most dangerous fuel system failures are the ones you can’t see at the dock. A hose that passed a visual check in the spring can develop an internal restriction by midsummer, especially with ethanol-blended fuel working on it from the inside.
Reading Hose Markings and Why Ethanol Changes the Math
Every compliant fuel hose carries printed markings along its jacket: the manufacturer’s name, the year of manufacture, and a hose type designation. Look specifically for “USCG Type A1” or “USCG Type A2,” along with a fire-resistance rating. If you can’t find any markings at all, or they’ve worn away to the point of being unreadable, treat that hose as unverified and plan to replace it.
Ethanol-blended fuel is where a lot of older hoses quietly fail. Ethanol acts almost like a solvent on older rubber compounds, leaching out plasticizers and softening the inner liner from the inside, well before the outer jacket shows any sign of wear. Hoses manufactured before ethanol blends became standard are especially vulnerable, even when they still look fine sitting in the engine room.
A few practical rules for evaluating what’s currently on your boat:
- Any hose without visible USCG type markings should be treated as suspect, regardless of how it looks
- Hoses labeled specifically as ethanol resistant, often marked in blue, are the safer standard for current fuel blends
- ABYC H-33 sets out the technical requirements for acceptable hose materials, minimum inside diameters, hose support spacing, and the pressure and installation tests that matter when you’re selecting a replacement
- Pre-2000s installations deserve a proactive look even if nothing seems wrong, since the materials from that era weren’t designed with today’s fuel chemistry in mind
Ethanol’s effect on rubber isn’t uniform. Depending on the compound and how old the hose is, it can either harden the material or turn it soft and gummy, which is exactly why a hands-on feel check matters as much as reading the printed markings.
Definitive Signs a Hose Needs to Come Off the Boat
Some findings during an inspection leave no room for a “keep an eye on it” call. If you find any of the following, the hose comes off the boat, full stop:
- Visible cracks or crazing anywhere on the outer jacket
- Chafe that’s worn through part of the jacket, even if it hasn’t reached the liner yet
- Any wetness, staining, or fuel odor along the run or at a fitting
- A soft, gummy, or collapsed feel to the inner liner when you flex or pinch the hose
- Bulging or swelling anywhere along the hose’s length
Beyond those hard triggers, most marine repair guides recommend replacing flexible fuel hose roughly every 5 to 10 years, depending on the hose material and how much heat and UV exposure it’s dealt with. If your boat’s fuel lines predate 2000, don’t wait for a failure to justify the upgrade. Get ahead of it.
When you’re genuinely unsure whether a section is still good, replace it. A short length of hose and a couple of clamps cost far less than a tow, and intermittent fuel line failures have an ugly habit of showing up at the worst possible moment, usually offshore.
Pro Tip: Write the installation year directly on the hose jacket with a permanent marker when you replace a section. It turns next year’s lifecycle check into a five-second glance instead of a guessing game.
Replacing a Hose Section Safely, and Where DIY Stops
Replacing a short, accessible section of fuel hose is well within reach for most owners who are comfortable working around their engine. The process itself isn’t complicated, but every step matters.
- Isolate the fuel supply and drain the section you’re working on, then ventilate the compartment thoroughly.
- Remove the clamps on the failed section and pull the old hose free, inspecting the mating barb fittings for corrosion or damage while it’s off.
- Cut the new hose to length with a square, clean cut, using USCG A1 or A2-rated hose that matches your engine’s fuel type.
- Slide the new hose over the barb with enough overlap to seat fully, then position the clamp behind the barb’s shoulder, not on top of it.
- Tighten the clamp enough to seal without cutting into the hose’s outer jacket, using 300-series stainless clamps rather than anything that will corrode.
- Leak-test the new connection with a soapy-water spray before restoring fuel and running the engine.
- Dispose of the old hose and any drained fuel through a proper hazardous-waste process, not the trash or the bilge.
That’s the extent of what most owners should tackle solo. Certain jobs cross a line where DIY work stops being appropriate, either for safety reasons or because they trigger formal testing requirements:
- Runs that pass through bulkheads or reach into inaccessible engine-room spaces
- Anything involving the fuel tank pickup, tank removal, or suspected tank corrosion, which is its own project entirely, as covered in our guide to marine fuel tank replacement
- Repairs to fire-resistant hose sections or any work that requires pressure testing per ABYC H-33
- Any job that changes the original routing or introduces new materials, since that can affect compliance
Pro Tip: If a job makes you second-guess clamp placement or hose routing even once, that’s your answer. Hire it out.
When to Stop and Call a Professional Technician
A handful of situations call for a marine technician every time, no exceptions. Pressure testing to ABYC standards, any repair touching the tank or its pickup tube, and large or hidden hose runs all fall outside what a DIY inspection should attempt to resolve alone.
- Suspected vapor leaks in an enclosed compartment, especially if you can smell fuel but can’t pinpoint the source
- Work that affects fire-resistant hose materials or vent flame arresters
- Installations requiring specific minimum hose inside diameters or support spacing per ABYC guidance
- Any pressure test called for as part of a compliance or insurance requirement
If you’re standing in a compartment and you’re not sure whether what you’re smelling is a real vapor leak or just background fuel odor, don’t debate it. Evacuate, ventilate, and get a professional yard’s engine maintenance team or marina service involved before you second-guess yourself further. It’s also worth reviewing your onboard fire safety workflow so extinguishers and ventilation gear are staged correctly before you ever need them in a hurry.
What ABYC Standards Require and What a Yard Adds
ABYC H-33 governs diesel fuel systems specifically, covering hose marking, minimum inside diameters, support spacing, and the pressure and installation tests that determine whether a system is actually liquid and vapor tight. For gasoline systems, related ABYC standards covering ventilation round out the picture. These aren’t suggestions drafted by a committee for the sake of paperwork.
Some ABYC requirements are incorporated by reference into federal regulations, which means a fuel system inspection isn’t purely a maintenance question. It can carry real compliance and insurance weight, particularly on a vessel that’s ever surveyed or sold.
A professional yard brings a few things to the table that a DIY inspection simply can’t replicate: formal pressure testing, tank inspection or polishing when contamination is suspected, replacement of fire-resistant hose sections with certified materials, and documentation that satisfies insurance or survey requirements. If you’re isolating electrical power before working near fuel, Banshee Batteries’ guide to safe battery disconnection covers the same isolation principle that applies here.
A Field Note on What Owners Usually Miss
I’ve seen a fuel hose that looked flawless from the outside collapse internally under load, stalling an engine mid-run while the owner swore nothing had changed. The outer jacket showed nothing. The problem was inside, where visual checks can’t reach.
That’s why the quick hands-on flex and the primer-bulb check matter so much. On more than one boat, that five-minute routine caught a hose on the edge of failing before it turned into a vapor leak at the worst possible time.
How Mazza Marine Handles Fuel System Work You Shouldn’t DIY
Once your inspection turns up something beyond a simple hose swap, that’s where Mazzamarine’s Florida network earns its keep. We handle full fuel system inspections, hose replacement with properly rated USCG materials, tank testing and polishing, and pressure testing to ABYC standards, along with emergency leak repair when something can’t wait for a scheduled slot.

Getting us involved doesn’t require a dock visit first. Call to describe what you found, send photos or a short video of the section that concerns you, and we’ll tell you honestly whether it’s a same-day fix or something that needs a scheduled inspection. Mino and Luigi built this network specifically so Florida yacht owners have one call to make instead of chasing down separate vendors for hose work, tank testing, and compliance documentation. If your inspection turned up cracking, chafe, or anything that smells like fuel where it shouldn’t, check our guide on the signs that mean it’s time for repair and reach out to schedule a proper look.
Frequently Asked Questions
How often should I check my yacht’s fuel lines?
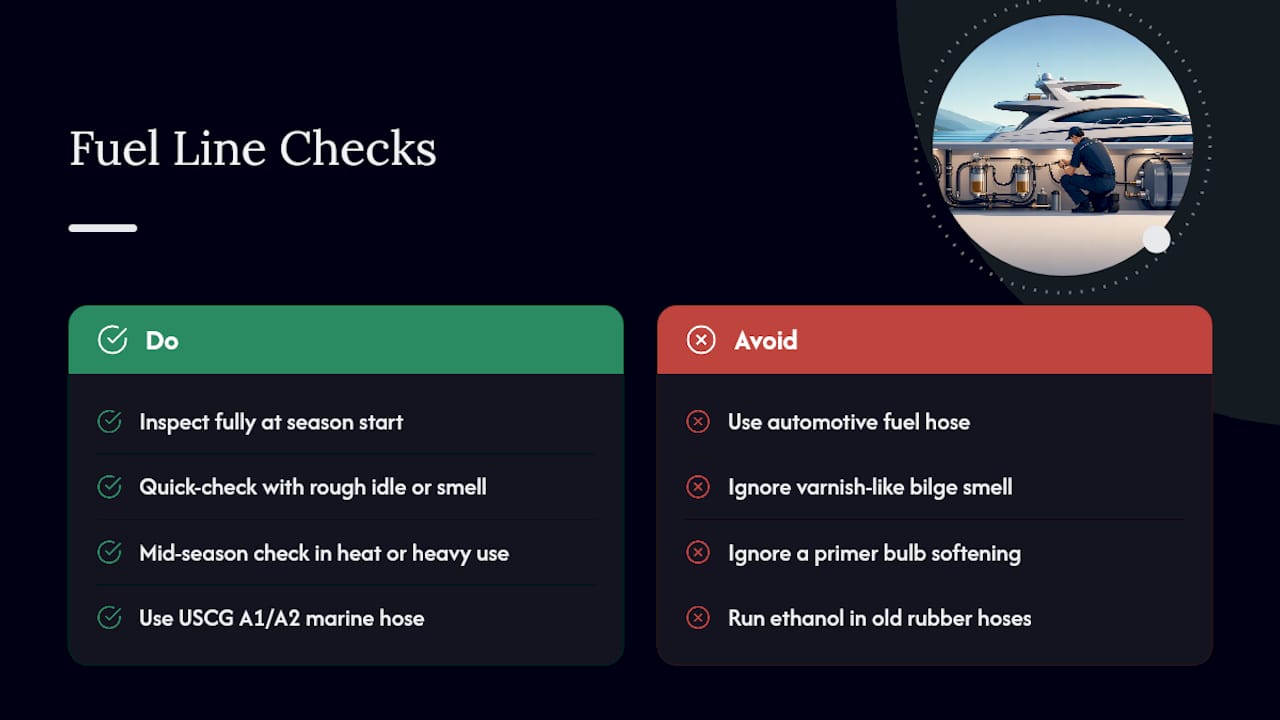
Do a full visual and hands-on inspection at the start of each season, plus a quick check any time you notice rough idling, hesitation, or a fuel smell. Boats that see heavy use or sit in high heat benefit from a mid-season check as well.
What does a failing fuel line smell like?
A sharp, sour, almost varnish-like odor in the bilge is the classic sign of fuel permeating through a hose wall, often showing up before any visible wetness appears.
Can I use automotive fuel hose on my boat?
No. Marine fuel hose must carry USCG Type A1 or A2 markings and meet fire-resistance standards that automotive hose isn’t designed or tested for.
Is it normal for a primer bulb to go soft after a few minutes?
No. A bulb that firms up and then slowly softens usually means the system is losing prime through a leak somewhere between the tank and the engine.
Does ethanol fuel really damage older hoses?
Yes. Ethanol can leach plasticizers out of older rubber compounds, degrading the inner liner well before the outer jacket shows visible wear.
Sources
- Marine fuel system maintenance: A practical guide for yacht owners
Recommended
Text or Call 954-330-9653 Schedule Appointment
Mazza Marine Yacht Services & Refit

Fiberglass Upgrades and Damage Repair

Premium Yacht Paint/ Faux Teak

Fishing: Custom Rods, Reels,Tackle

Electrical, Electronics and Navigation

Paint, Hull and Gelcoat

Teak Decks, Wood Cabinets, Carpentry

Canvas, Enclosures and Upholstery

Mechanical, Repower and Running Gear

Plumbing, Bilge and Thru-Hulls

Welding and Custom Fabrication

Interior Refit And Past Work
Get your yacht value Estimate
"*" indicates required fields