
View Our Recent Work:

Overview — Shut the seacock immediately. That single action, done in the first thirty seconds, is what separates a manageable scare from a catastrophe. If the valve won’t close, drive a tapered softwood plug into the opening from the inside, start every bilge pump aboard, and assign someone to watch the water level without stopping. Flooding is the highest-priority repair problem on any vessel, and time works against you from the moment water starts moving in. If inflow is outpacing your pumps, call for assistance and prepare to abandon ship. Gear and fiberglass can be replaced. People cannot.
Emergency sequence — first 60 seconds:
- Close the seacock on the affected fitting.
- If the seacock is seized or broken, drive a correctly sized tapered softwood plug into the opening from the inside.
- Switch on every electric bilge pump and deploy your manual backup.
- Assign one crew member to monitor water level and pump operation continuously.
- If inflow exceeds pump capacity, call the Coast Guard or nearby vessels and prepare to abandon ship.
Pro Tip: Tether a correctly sized softwood plug to every thru-hull fitting with a short lanyard. Store a rubber mallet in the same compartment. In a cramped bilge with water rising, you will not have time to search for either.
Key Takeaways
Closing the seacock immediately and driving a tethered softwood plug if the valve fails are the two actions that prevent most thru-hull leaks from becoming vessel losses.
| Point | Details |
|---|---|
| Shut the seacock first | Closing the seacock is the single highest-priority action; if it fails, drive a tapered softwood plug immediately. |
| Temporary fixes buy time only | Epoxy putty and wooden plugs hold for hours to 5–14 days in moderate conditions; haul-out is required for any permanent repair. |
| Haul-out warning signs | Dezincification, cracked flanges, soft core, or multiple simultaneous leaks all require professional repair, not another temporary fix. |
| Prevention beats emergency response | Exercise seacocks once per season, inspect hoses and clamps regularly, and tether plugs beside every thru-hull fitting. |
| Mazzamarine for permanent repairs | Mazzamarine connects Florida yacht owners with specialists for emergency haul-out, thru-hull replacement, and two-stage re-bedding. |
Table of Contents
- Should you attempt a repair or call for help right now?
- How do you find exactly where the water is coming from?
- What are the right temporary fixes for each type of failure?
- How do you apply the right emergency material?
- What should your onboard thru-hull emergency kit contain?
- How long do temporary fixes hold, and when must you haul out?
- What preventive maintenance actually prevents thru-hull failures?
- Your printable emergency checklist: shut, plug, pump, call
- When should you call a professional, and what can Mazzamarine do?
- Mazzamarine handles thru-hull repairs when the stakes are highest
- Sources
Should you attempt a repair or call for help right now?
Before you reach for the epoxy putty, take thirty seconds to assess what you are actually dealing with. A slow drip around a hose clamp is a very different problem from a pencil-stream gush through a cracked fitting body.
Estimate the inflow rate:
- Drip or seep: water collects slowly; a standard 500–750 GPH automatic bilge pump handles it easily while you investigate.
- Pencil stream: meaningful volume; a single pump may keep pace, but a second pump running in parallel is wise.
- Gush or open flow: pumps are likely losing ground; this is a call-for-help situation, not a DIY repair moment.
Rule of thumb: If you can see the bilge water level rising despite pumps running at full capacity, source control is your only option. Plug first, repair second.
Safety checklist before entering a confined space:
- Put on a personal flotation device before entering any tight bilge or engine room with active water ingress.
- Isolate electrical circuits in the affected compartment to prevent shock.
- Never work alone in a flooded or flooding space.
- Keep tools secured to your wrist or body so they cannot drop into the bilge and jam a pump impeller.
- Know your exit route before you go in.
A vessel that is stable with pumps keeping pace gives you time to work methodically. One that is losing ground demands a distress call, not a repair attempt.
How do you find exactly where the water is coming from?
Thru-hull fittings are the obvious suspects, but water in the bilge can come from a hose tail, a shaft seal, a transducer housing, or even a hull puncture. Misdiagnosing the source wastes precious time.
Step-by-step diagnostic order:
- Watch the bilge discharge rate with all pumps running. A sudden increase in pump cycling tells you the flow is active and significant.
- Close seacocks one at a time, starting with the lowest fitting below the waterline. Watch whether the pump cycle slows after each closure. The fitting whose closure slows the inflow is your source.
- With the suspect seacock closed, trace the hose from the fitting to its termination point. Run a flashlight and a small mirror on a stick along the full hose length, checking every clamp and hose tail for weeping.
- Check the shaft seal or stuffing box. A properly adjusted stuffing box drips a few drops per minute under way; a stream or spray is a failure.
- Inspect every transducer housing. Hairline cracks in the plastic body are easy to miss without a headlamp held at a low angle.
Tools that earn their place in this diagnosis:
- Headlamp (hands-free is non-negotiable in a dark bilge)
- Small telescoping mirror
- Food-grade dye or a few drops of colored water poured near a suspected fitting to trace flow direction
- A short borescope if hose runs disappear behind cabinetry
The distinction between a weep and an active breach matters. A weep, a slow seepage that leaves salt staining or “tea staining” around a fitting, is a warning sign you can manage temporarily. An active breach demands immediate action. Any play when you wiggle a fitting is a critical warning sign that bedding is failing and the fitting may be near structural compromise.
Pro Tip: Isolate seacocks one at a time rather than closing them all at once. Closing everything simultaneously tells you water stopped, but not which fitting was the culprit. Systematic isolation is your fastest path to the source.
What are the right temporary fixes for each type of failure?
Different failure modes call for different responses. Matching the fix to the failure type is what makes the difference between a repair that holds for three days and one that fails in the next wave.
Hose or hose-tail failure
- Close the seacock immediately to stop flow to the hose.
- Inspect the hose for the split or separation point.
- If the hose has split near the tail, cut back to sound hose material with a sharp knife and re-seat it fully onto the fitting barb.
- Apply two stainless hose clamps, positioned at least half an inch apart, and tighten firmly.
- If the hose is too short after cutting, bridge the gap with a properly sized joiner sleeve or a deep socket wrapped tightly with rescue tape as a temporary measure only.
Safety caution: Never reopen the seacock until both clamps are fully seated and tightened. A single clamp on a pressurized hose tail is not a repair.
Failed through-hull body
Close the seacock. If the valve itself has broken or seized, drive a tapered softwood plug into the opening from the inside and brace it if needed. If you have access from outside the hull and sea state permits, deploy a collision mat or fothering material over the fitting to reduce external pressure on the plug.
Small hull puncture below the waterline
Think containment, not perfection. From outside, a collision mat or heavy tarp pulled under the hull and held in place with lines will reduce inflow significantly. From inside, brace a compression patch, a piece of plywood backed with a 2×4 pressed against the breach, and hold it with lines led to strong points. Bracing an inward patch is often more effective than chemical patches that require clean, dry surfaces you simply will not have during active flooding.

Shaft seal or stuffing box leak
Reduce shaft RPM or stop the engine if safe to do so. A trained crew member can attempt to tighten the packing nut slightly, but over-tightening causes heat damage to the shaft. Wrap-and-clamp techniques using rubber sheet and hose clamps can slow a weeping seal temporarily. Assign someone to monitor shaft temperature continuously if the engine must keep running.
Transducer housing leak
Shut the seacock if the transducer is on a seacock circuit. For a hairline crack in the housing body, marine-grade epoxy putty pressed firmly into the crack and allowed to cure is a reasonable temporary measure. This is not a permanent fix and the transducer must be replaced at haul-out.
How do you apply the right emergency material?
Knowing which material to reach for, and how to use it correctly, is what separates a fix that holds from one that fails at the worst possible moment.
| Material | Best use case | Realistic hold time |
|---|---|---|
| Tapered softwood plug | Failed seacock or open thru-hull body | Hours to days, depending on sea state and vibration |
| Marine epoxy putty (e.g., JB Weld Marine) | Hairline cracks in transducer housing or fitting body | 5–14 days in moderate conditions, strictly temporary |
| Rescue tape / silicone self-amalgamating tape | Hose splits, minor pipe cracks, hose-tail weeps | Hours to a few days; degrades under sustained pressure |
| Collision mat / fothering material | Large hull breach or open thru-hull from outside | Hours; highly dependent on wave action and sea state |
| Compression patch (plywood + backing) | Interior bracing of a hull puncture | Hours to days; requires continuous monitoring |
Wooden plugs: sizing, driving, and securing
Select a plug that is slightly larger than the opening so it bites as you drive it. Wrap the plug in a rag or cloth before driving to improve the seal against irregular edges. Hold the cloth in place with one hand and drive the plug with a mallet using firm, steady blows rather than one hard strike. Once seated, tie the lanyard to a nearby fitting so water pressure cannot push it back out.
Softwood bites better than hardwood or plastic against irregular openings because it compresses and conforms. Products like the Forespar Sta-Plug are purpose-built for this task and worth carrying in multiple sizes.
Epoxy putty: kneading, application, and cure
Knead the two-part putty until the color is uniform, which typically takes about two minutes. Press it firmly into the crack or gap, working it into the surface with your thumb. It will adhere to wet surfaces, which is its primary advantage in an emergency. Most marine sealants for permanent repairs require 24–72 hours to reach sufficient cure for submersion, and epoxy putty is no different for full structural strength. Treat it as a time-buyer, not a solution.
Rescue tape and silicone wraps
These work best on hose splits and minor pipe cracks where the surface is relatively smooth. Stretch the tape to roughly half its width as you wrap, overlapping each layer by half. Temperature extremes and sustained water pressure reduce effectiveness. Clean the surface as much as possible before applying, even a quick wipe with a dry rag improves adhesion.
Collision mat and fothering
Collision mats and sail-fothering are field-proven external patches that the inflowing water actually helps hold in place once positioned. Pass lines under the hull from bow to stern, attach the mat to the lines, and work it into position over the breach. In calm conditions this is manageable with two people. In any kind of chop, it becomes difficult and potentially dangerous. Never attempt external hull work alone, and always wear a PFD.
Hold-time reality check: Every temporary fix described here is exactly that, temporary. None of them replace haul-out and professional repair. Their job is to get you and your crew safely to the dock.
What should your onboard thru-hull emergency kit contain?
A kit that is stowed but inaccessible is nearly as useless as no kit at all. Keep this gear in a clearly labeled, water-resistant container near the companionway or helm, not buried in a lazarette under three fenders.
Compact kit checklist:
- Tapered softwood plugs: 3–5 plugs covering the range of your thru-hull diameters (typically 1/2 inch through 2 inches); pre-tether one to each fitting
- Marine epoxy putty: two 57 g (2 oz) packs, such as JB Weld Marine or equivalent
- Rescue tape / self-amalgamating silicone tape: two rolls
- Forespar Sta-Plug or equivalent purpose-built bung set: one set in graduated sizes
- Stainless hose clamps: at least four per fitting size aboard, assorted
- Spare hose sections: short lengths matching your raw water and bilge hose diameters
- Rubber mallet: compact, fits in tight spaces
- Utility knife and fixed-blade knife: one each
- Heavy-duty zip ties: a dozen or more
- Headlamp with fresh batteries: one per crew member is ideal
- Small hose cutter or sharp shears
- Collision mat or heavy-duty tarp: folded and ready to deploy
Rehearse the actions with your crew at least once per season. A drill takes twenty minutes and can mean the difference between a controlled response and a panicked one. Label the kit clearly, check expiry dates on putty packs, and replace any clamps showing rust.
How long do temporary fixes hold, and when must you haul out?
Temporary repairs are a bridge to the dock, not a long-term strategy. Epoxy putty and rescue tape typically hold for 5–14 days in moderate sea conditions. Wooden plugs may last hours to days depending on vibration, wave action, and whether the fitting continues to move. None of these figures are guarantees, and conditions can shorten them dramatically.
Signs that a temporary fix is failing or that haul-out cannot wait:
- The leak rate is increasing despite the repair
- You can see or feel the plug working loose
- Multiple fittings are leaking simultaneously
- The bilge pump is cycling more frequently than before the repair
Haul-out warning signs that go beyond the immediate leak:
| Warning sign | What it indicates |
|---|---|
| Cracked thru-hull shoulder or flange | Structural failure; fitting must be replaced |
| Pink or red discoloration on bronze fittings | Dezincification; fitting is internally compromised |
| Core rot or soft spots around the fitting | Water intrusion into the laminate; core repair needed |
| Multiple simultaneous leaks | Systemic bedding failure or hull stress |
| Leak rate exceeding pump capacity | Immediate haul-out or assisted rescue required |
What does a permanent repair actually involve?
Permanent thru-hull repair requires the boat out of the water, full stop. The fitting is removed, the surrounding laminate is cleaned back to bare, sound material, and any compromised core is cut out and replaced. The new fitting is bedded using a two-stage process: apply marine sealant, tighten to squeeze-out, allow the sealant to skin, then apply final torque. This forms a durable gasket rather than squeezing all sealant out of the joint. The two-stage tightening method is recommended by experienced repair guides to produce a resilient, long-lasting seal.
Do not trust underwater application of permanent sealants. Products like 3M 5200 and 3M 4200 require clean, dry surfaces and proper cure time to perform as designed. Applying either underwater produces an unreliable bond that will fail. Haul-out is the only reliable permanent route.
What preventive maintenance actually prevents thru-hull failures?
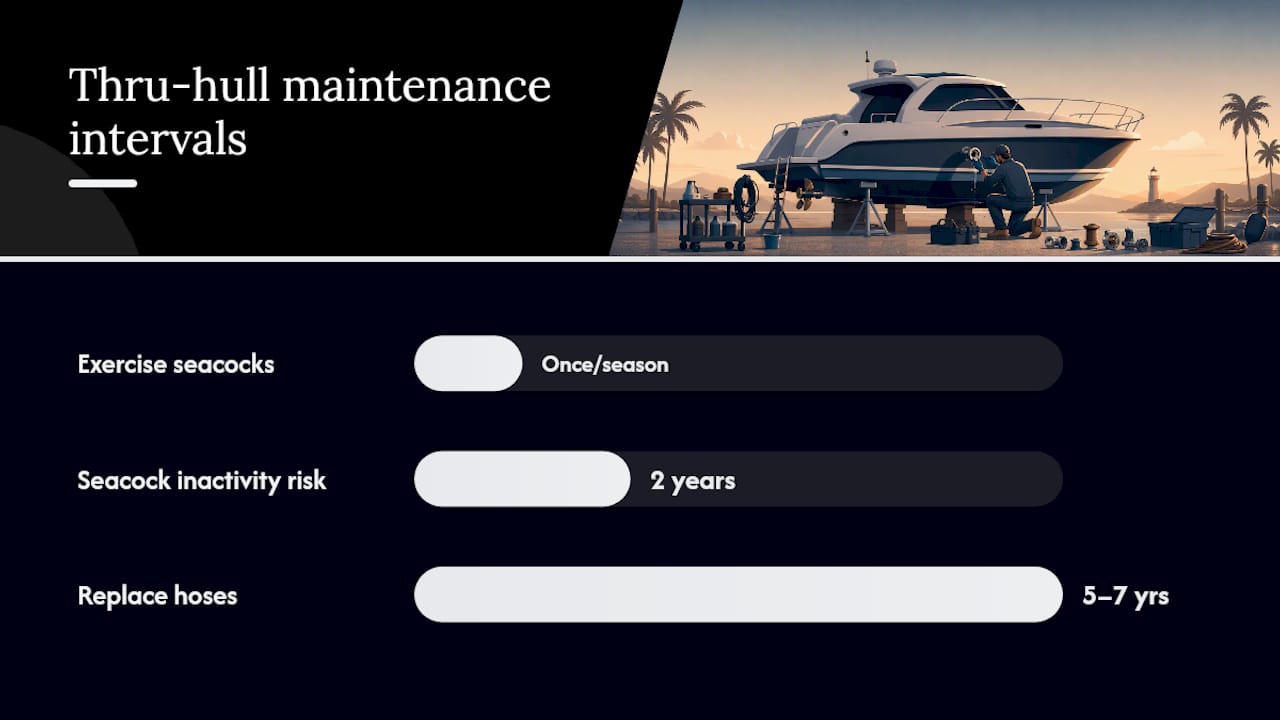
Most thru-hull emergencies are not random bad luck. They are the predictable result of deferred maintenance. Seized seacocks are a leading contributor to escalated emergencies, and ABYC guidance requires functional seacocks on all openings below the maximum heeled waterline. A fitting that cannot be closed in an emergency is a liability, not a safety feature.
Seasonal maintenance checklist:
- Exercise every seacock at least once per season. Open and close it fully, then leave it in the open position. A seacock that has not moved in two years will likely not move when you need it.
- Inspect hoses for mushiness, cracking, or delamination at the hose tails. Squeeze the hose along its full length. Any soft spot is a replacement candidate.
- Replace hoses on a schedule. Most marine hose manufacturers recommend replacement every 5–7 years regardless of appearance.
- Check hose clamps for rust, corrosion, or stripped screws. Replace any clamp that shows surface rust; stainless clamps with a solid band (not perforated) are the correct choice below the waterline.
- Inspect bonding wires connected to underwater fittings. A loose or corroded bonding connection accelerates galvanic corrosion internally.
- Look for dezincification on bronze fittings: pink or reddish discoloration where the zinc has leached out, leaving a porous, weakened copper structure. This can happen while the exterior looks perfectly acceptable.
For seacock maintenance procedures and exercise schedules, a step-by-step guide covers the full process in detail.
Choosing the right sealant: 3M 4200 vs. 3M 5200
The choice between these two products matters more than most owners realize. A through-hull fitting paired with the wrong sealant is a future problem waiting to happen.
3M 5200 is a permanent, polyurethane adhesive sealant with exceptional bonding strength. Use it when you never intend to remove the fitting. It cures to a near-permanent bond that makes future removal extremely difficult without damaging the surrounding laminate.
3M 4200 offers strong adhesion with a semi-permanent bond that allows future removal without destroying the substrate. For most thru-hull installations where the fitting may need replacement during the boat’s life, 3M 4200 is the more practical choice. It also tolerates some movement better than 5200.
Neither product should be applied to wet or contaminated surfaces. Both require the full cure schedule before the vessel returns to the water.
Pro Tip: For thru-hull fitting selection and material choices specific to Florida’s saltwater environment, bronze fittings with Marelon or Forespar seacocks are worth the investment over plastic for raw water intakes. The cost difference is trivial compared to the risk.
Your printable emergency checklist: shut, plug, pump, call
Screenshot this section and keep it near the helm. Walk your crew through it before you leave the dock.
First 10 minutes of a thru-hull leak event:
- Secure people first. Put on PFDs. Account for all crew. Assign roles.
- Shut the seacock on the affected fitting. If you cannot identify which one, close all seacocks below the waterline.
- Drive a plug if the seacock is broken, seized, or missing. Use the tethered plug beside the fitting.
- Start all bilge pumps. Switch on electric pumps and deploy the manual backup. Assign one person to pump continuously.
- Reduce vessel motion. Head into the wind or slow to minimum steerage to reduce water pressure on the breach.
- Monitor and report. Note your GPS position, the rate of ingress, and the number of people aboard. Report to the Coast Guard on VHF Channel 16 if inflow is not controlled within five minutes.
- Attempt a temporary fix only if pumps are keeping pace and you have a clear, safe path to the fitting.
- Head for the nearest safe harbor as soon as the situation is stabilized.
Before you practice this drill, confirm:
- Every crew member knows where each seacock is located and how to close it.
- The plug kit is tethered and accessible, not locked in a storage locker.
- The VHF radio is charged and set to Channel 16.
- The manual bilge pump handle is within reach of the helm.
Practice this sequence at the dock once per season. It takes less than fifteen minutes and builds the kind of muscle memory that functions under stress.
When should you call a professional, and what can Mazzamarine do?
Some situations are beyond what any temporary fix can address. Knowing when to stop improvising and call a professional is as important as knowing how to drive a plug.
Call a professional immediately when:
- You can see a crack in the thru-hull shoulder, flange, or body.
- The hull core around the fitting feels soft, spongy, or delaminated.
- Bronze fittings show pink or red discoloration indicating dezincification.
- Two or more fittings are leaking simultaneously.
- The leak rate is exceeding your pump capacity despite a plug in place.
- The seacock cannot be operated and no plug is holding reliably.
Mazzamarine’s network of Florida yacht specialists handles exactly these scenarios, from emergency haul-out coordination and thru-hull replacement to core repair, two-stage re-bedding with marine-grade sealants, and full bonding system inspection. For owners who have just completed a temporary fix and need a clear path to permanent repair, the yacht plumbing repair steps guide outlines what to expect from a professional service visit.
What to prepare before the haul-out:
- Note the exact location and description of every fitting showing signs of failure.
- Photograph the affected area with a waterproof camera or phone in a dry bag.
- Confirm fuel levels are low enough for safe haul-out.
- Clear access to the bilge and engine room so technicians can work without delay.
- Have your vessel documentation and insurance information ready.
Questions worth asking any technician:
- Will you inspect the surrounding laminate and core, not just the fitting itself?
- What sealant will you use, and why?
- What is the cure schedule before the boat can return to the water?
Pro Tip: Vessel insurance policies often require documented evidence of maintenance and prompt professional response after a damage event. Keeping a vessel insurance checklist current before an incident makes the claims process significantly smoother.
What experience actually teaches about thru-hull failures
There is a scenario that plays out more often than it should: a boat comes in after an overnight passage with a bilge pump that ran continuously for six hours. The owner knew something was off but assumed the pump was handling it. By the time the fitting was inspected, the core around it had been wet for months, the bronze showed early dezincification, and the hose clamp had corroded through on the inside where no one had looked.
The temporary fix that got the boat home was a tethered softwood plug driven in by a crew member who had practiced the drill once, six months earlier. That single drill is what made the difference.
Three lessons come out of that kind of incident, every time. First, preparation is not about having the right gear in a locker. It is about having the right gear accessible and knowing how to use it under stress. Second, inspection frequency matters more than inspection thoroughness. A quick monthly look at hose clamps and fitting flanges catches problems that a thorough annual survey misses because the annual survey happens once. Third, temporary fixes work. They buy time. But every owner who has used one should schedule the permanent repair before they leave the dock again, not after the next season.
The boats that sink at the dock, or worse, offshore, are almost never the ones where something catastrophic happened without warning. They are the ones where the warning signs were there and the repair was deferred.
Mazzamarine handles thru-hull repairs when the stakes are highest
When a temporary fix has done its job and it is time for the permanent solution, you want a team that has seen every variation of this problem and knows exactly what a proper repair looks like from the laminate out.

Mazzamarine connects Florida yacht owners with a trusted network of specialists for urgent thru-hull repair, professional haul-out, core restoration, and two-stage re-bedding using the correct marine-grade sealants for each application. No guesswork about whether 3M 4200 or 5200 is right for your fitting. No shortcuts on cure time. The marine repair service guide covers the full scope of what a professional thru-hull repair involves and what owners should expect at each stage. For owners who want to reduce the odds of ever facing this situation again, the smarter yacht maintenance program builds a scheduled inspection and service rhythm around your vessel’s specific systems. Call or message Mazzamarine today with your vessel details, location, and a description of the issue, and the right specialist will be in touch promptly.
Sources
The following sources informed this guide and are worth bookmarking for deeper reading:
- Yachting Monthly
- American Boat and Yacht Council (ABYC)
- Bestboating
- Cruising Club (Cruising Club of America / specialty article)
Recommended
Text or Call 954-330-9653 Schedule Appointment
Mazza Marine Yacht Services & Refit

Fiberglass Upgrades and Damage Repair

Premium Yacht Paint/ Faux Teak

Fishing: Custom Rods, Reels,Tackle

Electrical, Electronics and Navigation

Paint, Hull and Gelcoat

Teak Decks, Wood Cabinets, Carpentry

Canvas, Enclosures and Upholstery

Mechanical, Repower and Running Gear

Plumbing, Bilge and Thru-Hulls

Welding and Custom Fabrication

Interior Refit And Past Work
Get your yacht value Estimate
"*" indicates required fields