
View Our Recent Work:

A basic in-well aerator kit costs between about eighty and one hundred fifty dollars, a proven cooler-and-pump DIY build can come in under eighty dollars, and a full recirculating thru-hull system with professional labor often costs several hundred to over a thousand dollars. Most weekend anglers get everything they need from an in-well kit or a light recirculation upgrade. Tournament fishermen hauling heavy limits in Florida summer heat are the ones who should budget for the full pro install, because that’s where plumbing geometry and battery capacity start to matter more than the pump itself.
TL;DR:
- Professional recirculating thru-hull systems can cost over a thousand dollars, especially when extensive plumbing modifications are needed for optimal flow.
- DIY upgrades, including basic pumps and fittings, typically range from $60 to $175, but improper installation can lead to repeated fixes and higher long-term costs.
- Proper inlet and outlet placement is critical to prevent dead zones and stress on fish, making professional assessment valuable for complex or hull-integrated systems.
- Continuous-use pumps draw sufficient current to drain small batteries in a tournament day, often requiring a dedicated deep-cycle battery for reliable operation.
- A well-installed livewell system tailored to the boat’s intended use can increase resale value, while mismatched or poorly executed upgrades may mislead buyers and reduce perceived boat quality.
Table of Contents
- How Much Does a Livewell Upgrade Cost?
- DIY vs Professional: Full Cost Breakdown and Tradeoffs
- Installation Steps, Timeline, and Power Draw
- How to Choose the Right Livewell Upgrade
- Maintenance and Operating Costs After Installation
- Impact of Livewell Upgrades on Boat Resale Value
- Compatibility of Upgrades With Different Boat/Livewell Models
- Long-Term Reliability and Warranty Considerations
- Environmental Compliance and Regulations Relevant to Livewell Upgrades
- Mazza Marine’s Perspective: When a Professional Refit Saves Money and Fish
- Get a Straight Estimate on Your Livewell Refit
- Sources
How Much Does a Livewell Upgrade Cost?
The honest answer depends less on the price tag and more on how hard you plan to use the livewell. A guy running a single rod on Saturday mornings has different needs than a captain who keeps forty pounds of pilchards alive through a nine hour tournament day. Here’s how the real numbers break down across the common upgrade paths.
Portable aerator coolers and bait boxes sit at the low end. Pairing a quality insulated cooler with a SEAFLO or Marine Metal pump kit creates a functional livewell for under eighty dollars. Pre-built portable units cost more but offer design touches like rounded interior corners that reduce fish injury and warranty coverage you don’t get from a cooler you drilled yourself.
In-well aerator kits are the most common mid-range upgrade for boats with a built-in well that just needs better circulation. The Johnson Pump In-Well Aerator Kit retails in the one hundred fifteen to one hundred twenty-five dollar range and includes a 500 GPH pump, aerator head, hose, and switch. Comparable Pro-Air style systems with dual outlets and air stones retail for about one hundred twenty-nine dollars.
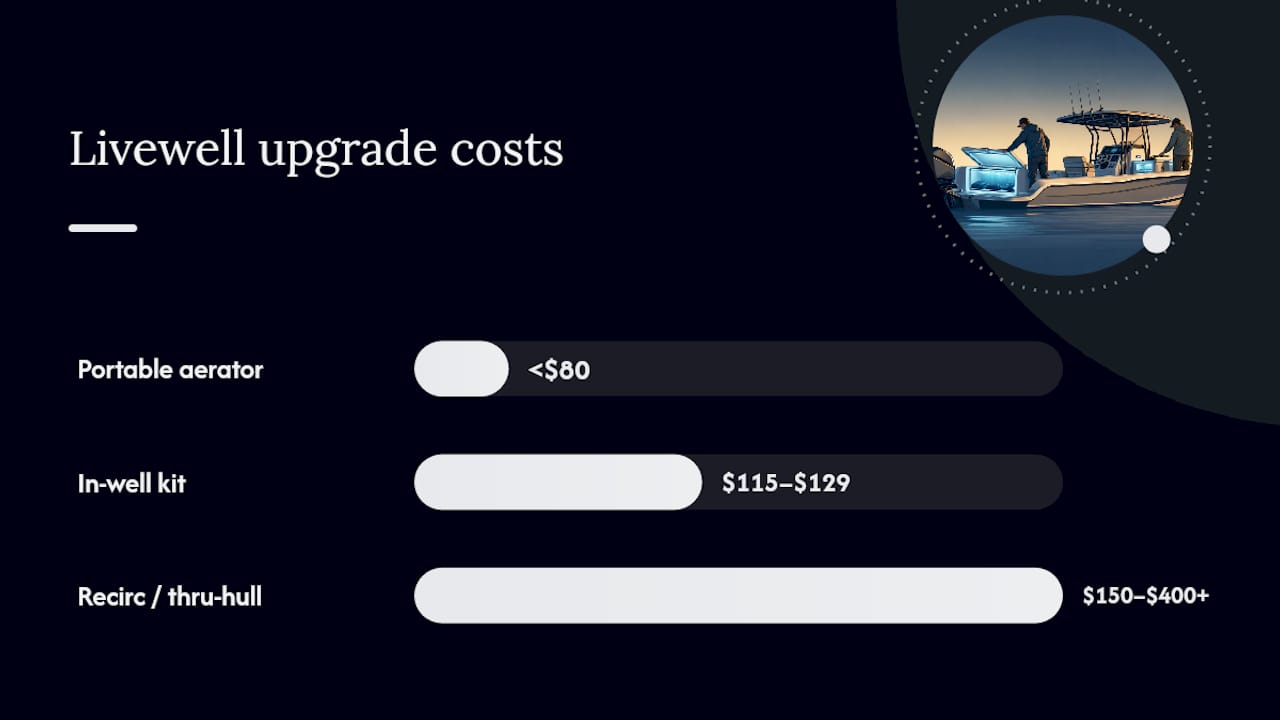
Recirculating and thru-hull systems solve the problem at the root instead of bolting on a stronger pump. Parts alone (seacock, thru-hull fitting, hose runs, check valve) often cost between about one hundred fifty and four hundred dollars, and that’s before labor.
Venturi setups and plumbing-only improvements cost the least in parts, often under one hundred dollars, but they demand precise inlet and outlet placement to work. Get the geometry wrong and you’ve spent money creating dead zones instead of fixing them.
A few add-ons push the number up regardless of which path you pick:
- Timers for automated cycling: between about fifteen and forty dollars
- Dual-well plumbing splits: between about one hundred and three hundred dollars in extra fittings and hose
- Insulated or purpose-built replacement livewells: generally two hundred to six hundred dollars depending on size
DIY vs Professional: Full Cost Breakdown and Tradeoffs
A DIY parts list for a basic upgrade looks like this:
- 500-800 GPH pump: priced roughly between thirty and eighty dollars
- Marine-grade hose (per foot): $2 to $5
- Fittings and hose clamps: $10 to $25
- Toggle switch or timer: $10 to $40
- Aerator stone or head: about eight to twenty dollars
Add it up and a careful DIY job can land at $60 to $175 in parts, plus a Saturday afternoon of your time.
Professional shop labor for marine plumbing and electrical work typically runs in the range you’d see for comparable boat air conditioning repair labor benchmarks, and a straightforward pump swap might take two to three hours. A full thru-hull recirculation job, with seacock evaluation, new hose runs, and correct plumbing geometry, often takes a full day or more once you account for haul access and testing.
Here’s where DIY gets expensive: a poorly placed inlet or an undersized hose run means redoing the job later, sometimes twice, before someone finally routes it correctly. Many owners spend on temporary fixes before paying for a permanent refit, and that second (or third) attempt is what actually drives the total cost past what a professional install would have run from the start.
Pro Tip: If your boat needs new thru-hull fittings or seacock work of any kind, get a professional quote before buying pump parts. The plumbing job usually costs more than the pump, and doing them together saves a haul-out fee.
Hire a pro once your project touches the hull (any thru-hull or seacock work), once it requires rewiring beyond a simple switch, or once you’ve already redone a DIY fix more than once.
Installation Steps, Timeline, and Power Draw
A portable kit install is the fastest path: mount the pump, run the hose, wire the switch, test it. Most owners finish in under an hour with zero shop time.
An in-well kit takes longer because you’re working inside an existing well. Expect one to two hours of labor if you hire it out, covering pump mounting, hose routing, and a switch or timer wire-in.
A thru-hull recirculation install is the real project. Shops typically quote four to eight hours depending on hull access, seacock condition, and whether the thru-hull placement needs to change from the factory location.
Power draw matters more than most anglers expect:
- Small 500 GPH pumps: 1.5 to 3 amps continuous
- Larger 800 GPH aerator pumps: 3 to 5 amps
- Air-only aerator systems: under 1 amp
A pump running continuously for a 10-hour tournament day can pull 30 to 50 amp-hours, which is enough to matter on a smaller cranking battery bank. Boats running continuous recirculation in summer heat or for heavy loads often need a dedicated deep-cycle battery or an upgraded charging setup, while timed aeration in cooler conditions puts far less strain on the system.
Every livewell pump wired into 12V house power should run through an ignition-protected switch and marine-rated wiring. Corroded or undersized wiring is one of the most common reasons a brand-new pump underperforms within a season.
How to Choose the Right Livewell Upgrade
Match the solution to how you actually fish, not to what looked impressive in a catalog. A guy soaking two rods for bass doesn’t need the same system as a mahi tournament boat running a full baitwell at capacity for hours.
Flow rate is the detail most anglers get wrong. Industry guidance points toward circulating the full livewell volume once every 5 to 10 minutes rather than maximizing GPH. A pump that’s too aggressive creates turbulent jets that stress and injure fish instead of helping them.
Before hiring anyone, ask:
- What’s the warranty on parts and on the labor separately?
- What battery setup do you recommend for continuous use?
- Can I see photos of a comparable install you’ve completed?
- Will this require any thru-hull or seacock work?
Watch for red flags. A quote that skips inlet and outlet placement entirely, a pump sized well beyond what your well volume needs, or an installer who can’t explain why they chose a particular hose routing are all signs you’re getting a band-aid instead of a real fix.
Pro Tip: Ask to see the inlet and outlet placement on a completed job before you commit. Good recirculation design creates a rolling flow with no dead zones, and you can usually see it in how the fittings are angled.
Maintenance and Operating Costs After Installation
The pump is rarely the part that fails first. Air stones clog and need replacing every season for $5 to $15 each. Impellers wear out on higher-use pumps and run $15 to $40 to replace. Hose and check valves degrade with saltwater exposure and typically need attention every one to two years, at $10 to $30 per fitting.
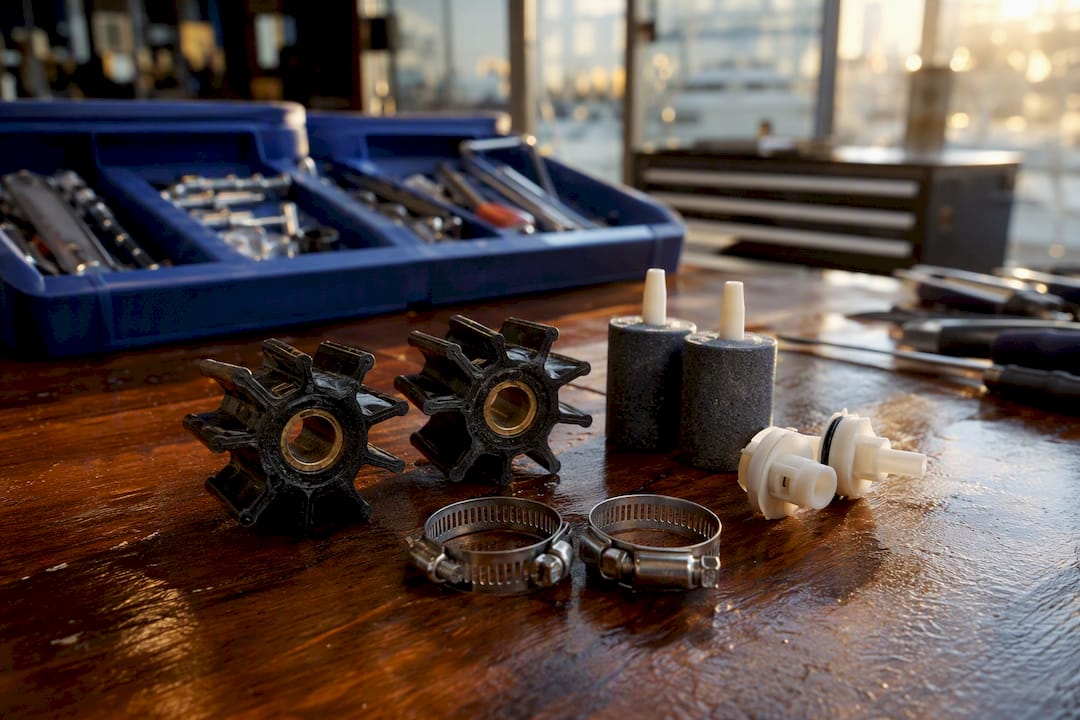
Inspect fittings and hose clamps at the start of each season, and rinse the pump housing with fresh water after saltwater trips to slow corrosion.
Continuous-use setups cycle batteries harder, which shortens battery life and can eventually mean an earlier-than-expected replacement. Simple habits, like switching to timed aeration for light loads instead of running continuous recirculation out of habit, cut both battery wear and shop visits significantly.
Impact of Livewell Upgrades on Boat Resale Value
A well-executed livewell upgrade tends to show up as a genuine selling point on a sportfish or center console listing, particularly in Florida’s tournament-heavy market where buyers actively search for boats already set up to keep bait and catch alive. Buyers touring a boat notice a properly plumbed, quiet-running recirculation system almost immediately, because it signals the previous owner maintained the boat rather than patched it.
The reverse is also true. A visibly jury-rigged pump, exposed wiring, or a cooler wedged into a factory well space reads as a red flag during a sea trial, even if it functions fine. Buyers who fish seriously will ask pointed questions about the aeration system, and a hesitant answer costs more in negotiating leverage than the upgrade itself would have cost to do right.
Where the upgrade adds the least value is in mismatched installs, a $1,200 recirculation system on a boat that will never see tournament use, or a $60 cooler rig on a boat marketed as tournament-ready. Buyers expect the livewell setup to match the boat’s intended use, and a mismatch either looks like overspending or underdelivering.
If resale is part of your thinking, a mid-tier in-well kit installed cleanly, with proper wiring and no visible improvisation, tends to offer the best return relative to cost. It signals competent ownership without over-investing in a feature that’s hard to fully recoup at sale.
Compatibility of Upgrades With Different Boat/Livewell Models
Not every livewell accepts every upgrade path, and this is where a lot of DIY plans stall. Factory-molded wells on production center consoles usually have limited space for a larger pump or a second outlet, which caps how much circulation improvement an in-well kit alone can deliver.
Older boats, particularly those built before the mid-2000s, sometimes have livewells plumbed with fittings and hose sizes that no longer match current standard parts. That mismatch means a straightforward pump swap can turn into a full re-plumb once you discover the existing hose barbs don’t fit anything sold today.
Sportfish boats and custom-built livewells generally offer the most flexibility, since they were often designed with recirculation and thru-hull routing in mind from the start. Retrofitting a true recirculating system onto a factory production boat, by contrast, may require rerouting hose runs through spaces never intended for them, which is part of why that job commonly lands at the higher end of the several hundred to over a thousand dollar range.
Before buying any kit, measure your well’s dimensions, note the existing fitting sizes, and check whether your hull has an accessible location for a new thru-hull if you’re considering recirculation. A kit that’s perfect on paper is worthless if it doesn’t physically fit your well’s inlet spacing or plumbing layout.
Long-Term Reliability and Warranty Considerations
Pump warranties in this category typically run one to two years, covering manufacturer defects but rarely covering damage from improper installation, which is where a lot of DIY warranty claims get denied. A pump that burns out because it was wired without ignition protection, or one that seizes from debris because there’s no strainer on the intake, is an installation problem, not a product defect, and most manufacturers will say exactly that.
Labor warranties from professional installers vary shop to shop, but a reasonable expectation is coverage on workmanship for at least a year, separate from whatever the parts manufacturer offers. Ask about this distinction specifically, because “warranty” without qualification often means only the parts, not the installer’s work.
Reliability over multiple seasons tends to track back to two things: whether the intake had a strainer to keep debris out of the pump, and whether the wiring was properly protected from moisture and corrosion. Pumps installed with neither often fail within a season or two in saltwater use, regardless of the brand name on the box.
If you’re weighing a DIY install against a professional one purely on reliability, the deciding factor usually isn’t the pump itself. It’s whether the installation accounted for strainer placement, wire routing away from bilge water, and a switch rated for marine use. Get those three right and most mid-range pumps will run for years.
Environmental Compliance and Regulations Relevant to Livewell Upgrades
Livewell upgrades themselves aren’t heavily regulated the way, say, holding tank discharge is, but a few practical compliance points matter once you’re modifying plumbing and electrical systems on the water. Any new thru-hull fitting needs to meet standard marine construction practices for below-waterline penetrations, since a poorly fitted or unsealed thru-hull is both a sinking risk and, in some marinas, a condition that can affect insurance coverage.
Electrical work tied to a livewell pump should follow ignition protection standards for gasoline-powered boats, which exist specifically to prevent pump motors or switches from becoming an ignition source near fuel vapors. This isn’t optional guidance. It’s the kind of detail marine surveyors check during a pre-purchase inspection, and a non-compliant wiring job can flag an otherwise clean survey.
There’s no federal or state rule dictating livewell flow rates or aeration methods for recreational anglers, so the 5 to 10 minute turnover guidance discussed earlier is a best practice rather than a legal requirement. Tournament organizations sometimes set their own livewell standards for catch-and-release events, so it’s worth checking specific tournament rules if you’re upgrading with competition in mind rather than general recreational use.
Mazza Marine’s Perspective: When a Professional Refit Saves Money and Fish
Plumbing geometry is the part DIY guides gloss over, and it’s the part that actually determines whether a recirculation upgrade works. Getting inlet and outlet placement wrong doesn’t just waste money. It stresses or kills the fish you’re trying to keep alive, which defeats the entire purpose of the upgrade.
We see the same pattern across sportfish livewell refits and integrated recirculation projects: owners who tried a pump swap first, hit a wall, then called us once they realized the fix required touching the hull. That’s not a failure on their part. Thru-hull work and seacock evaluation genuinely require training most weekend mechanics don’t have.
If your livewell needs more than a pump swap, request an inspection before you buy another part by checking PVC plumbing projects and fittings that clarify hose and fitting choices for livewell upgrades. It’s often cheaper than the alternative.
— Jason
Get a Straight Estimate on Your Livewell Refit
Mazzamarine handles the plumbing side of livewell upgrades that most DIY guides can’t, from seacock evaluation to full thru-hull recirculation runs, so you get a system built right the first time instead of a patch you’ll redo next season.

Our marine plumbing and sportfish upgrade teams work across South Florida, and an initial estimate covers your well’s current setup, whether existing fittings can be reused, and a clear timeline before any work starts. If your boat’s livewell needs correct plumbing geometry rather than another pump, start with a custom refit consultation and get a real quote before your next trip.
Sources
Price bands and pump specs referenced above come from product listings including Johnson Pump kits and flow guidance from PartsVu. Retail prices vary by season and dealer, so treat these ranges as a starting point, not a fixed quote.
- Johnson Pump In-Well Aerator Kit – Enhance Live Well Aeration | 34024 – Anchor Express
- Livewell pump essentials: choosing the right flow rate — PartsVu
- Understanding livewells, aerators & oxygen systems — BoatersCatalog
Recommended
Text or Call 954-330-9653 Schedule Appointment
Mazza Marine Yacht Services & Refit

Fiberglass Upgrades and Damage Repair

Premium Yacht Paint/ Faux Teak

Fishing: Custom Rods, Reels,Tackle

Electrical, Electronics and Navigation

Paint, Hull and Gelcoat

Teak Decks, Wood Cabinets, Carpentry

Canvas, Enclosures and Upholstery

Mechanical, Repower and Running Gear

Plumbing, Bilge and Thru-Hulls

Welding and Custom Fabrication

Interior Refit And Past Work
Get your yacht value Estimate
"*" indicates required fields