
View Our Recent Work:

Overview — most marine fibreglass repairs fall into one of two camps: cosmetic work you can tackle on a Saturday with the right kit, and structural damage that genuinely needs a professional’s hands. The line between them is simpler than most guides admit. If the damage is limited to the gelcoat layer, sits above the waterline, and covers an area smaller than roughly a dinner plate, a confident DIYer can handle it. The moment you find soft spots, flexing laminate, a compromised transom, or anything below the waterline on a cored hull, stop and call a pro.
Quick decision checklist — before you pick up a grinder:
- Is the damage purely cosmetic (scratches, chips, surface crazing with no laminate breach)? DIY-friendly.
- Is it above the waterline and away from structural members (stringers, transom, keel area)? DIY-friendly.
- Does the hull feel solid when you press firmly around the damage? DIY-friendly.
- Do you hear a dull thud (not a crisp tap) when you knock around the repair zone? Stop — possible delamination.
- Is there any soft, spongy, or wet feeling in the surrounding laminate? Call a pro.
ABYC-certified technicians are the standard to request for any structural or safety-critical work. For Florida owners dealing with complex hull damage, Mazzamarine’s network of vetted marine technicians covers everything from urgent repairs to full laminate rebuilds.
Pro Tip: Before touching anything, photograph the damage from multiple angles in good light, mark the full extent with a grease pencil, and let the area dry completely for at least 24 hours. Wet laminate hides the true scope of damage and will ruin a repair if you work over it.
Key Takeaways
Most marine fibreglass repairs are manageable DIY jobs when damage is cosmetic and above the waterline, but structural, cored-hull, or below-waterline work requires a professional with a documented process and controlled cure environment.
| Point | Details |
|---|---|
| DIY scope is limited | Gelcoat scratches, small chips, and minor above-waterline patches are owner-appropriate; structural and core damage are not. |
| Scarf ratio matters | Professional structural repairs require a minimum 12:1 scarf ratio to restore laminate strength and prevent early failure. |
| Epoxy for critical work | Use epoxy (not polyester) for below-waterline and structural repairs; always add an epoxy barrier coat before returning to service. |
| Cure conditions are non-negotiable | Repairs must cure at appropriate temperatures and humidity; a rushed or outdoor cure in Florida heat compromises the result. |
| Vet your shop carefully | Request ABYC-certified technicians, a climate-controlled workspace, a written scope with warranty, and a portfolio of comparable work. |
| Mazzamarine for pro-level work | Mazzamarine’s Florida network handles transom rebuilds, blister treatments, and structural laminate repairs with a documented, climate-managed process. |
Table of Contents
- What types of marine fibreglass damage do you actually have?
- Step-by-step DIY fibreglass repairs for common small jobs
- Why structural and cored-hull repairs usually need a professional
- How do you choose the right resin and materials for the job?
- Safety, curing conditions, and ventilation — getting this right matters
- What do fibreglass repairs actually cost, and how long do they take?
- How do you find and vet a fibreglass repair shop in the U.S.?
- How Mazzamarine handles fibreglass repairs
- Cleanup and proper disposal of fibreglass repair waste
- Ready to get your boat back on the water?
- Sources
What types of marine fibreglass damage do you actually have?
Knowing what you’re dealing with is half the battle. Fibreglass boat repair covers a wide spectrum, and misidentifying the damage category is the most common reason DIY repairs fail within a season.
Gelcoat scratches and chips
These are surface-only injuries. The gelcoat layer on most production boats is relatively thin, and a scratch that hasn’t broken through to the laminate beneath is purely cosmetic. You’ll see the white or off-white fibreglass weave if you’ve gone deeper. Chips expose the laminate to moisture, so they need attention even if they look minor.
Stress cracks
Stress cracks (sometimes called “spider cracks” or “crazing”) radiate outward from a point of repeated flexing or impact. A single hairline crack in gelcoat is usually cosmetic. A starburst pattern, or cracks that reappear after you fill them, signals underlying laminate movement — that’s a structural conversation.
Deep gouges and punctures
Any breach that cuts through the gelcoat and into the laminate layers is a structural concern until proven otherwise. Small punctures above the waterline on a solid (non-cored) hull can be patched by a careful DIYer. Anything larger than a few inches, or any puncture near a through-hull fitting, belongs in a shop.
Osmotic blisters
Blisters form when water migrates through the gelcoat and reacts with water-soluble compounds in the laminate, creating pressure pockets. They’re common on boats that live in the water year-round, especially in warm Florida waters. Minor surface blisters can be treated, but widespread osmosis affecting the laminate itself requires a full peel-and-barrier treatment — a weeks-long process. For a detailed look at blister and osmosis repair costs in Florida, Mazzamarine has a dedicated resource.
Delamination and core damage
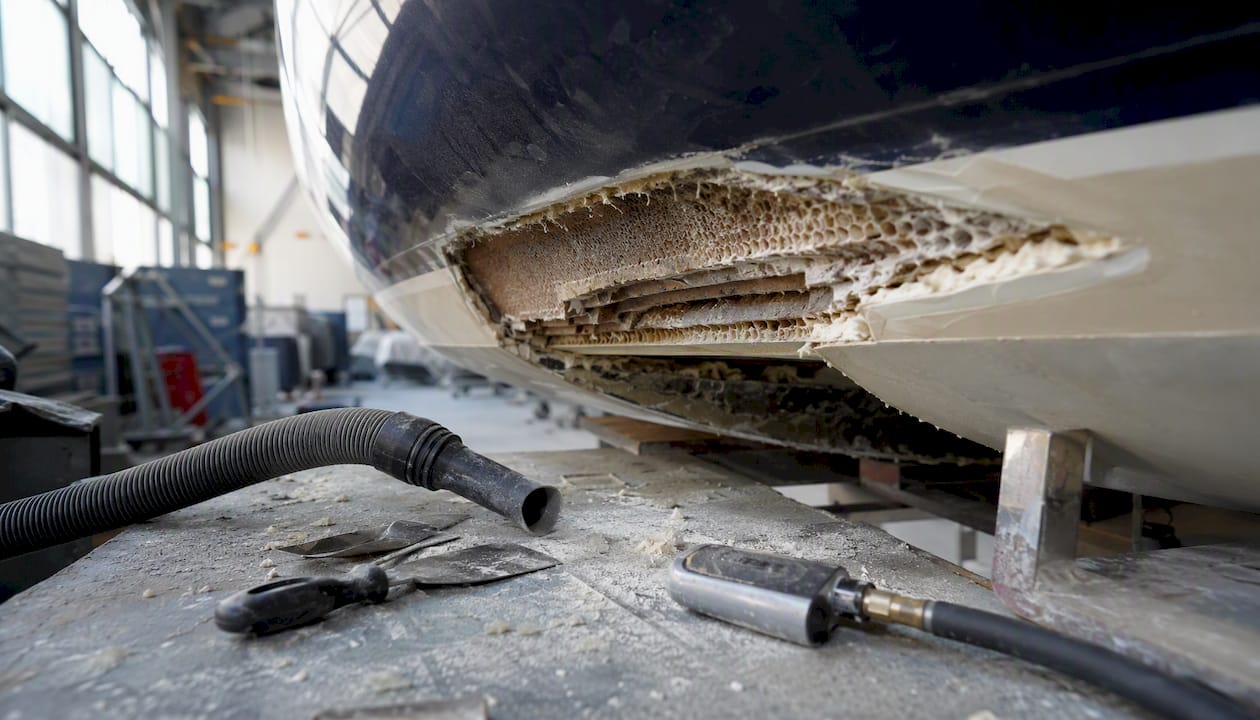
Cored hulls use a lightweight core material (balsa, foam, or honeycomb) sandwiched between inner and outer fibreglass skins. When water infiltrates a cored hull, the core saturates, rots, or crushes, and the skins separate. This is serious. Gelcoat problems are usually cosmetic, while structural or core damage is more serious and expensive to fix — and core replacement is among the most labor-intensive repairs in the trade.
Structural cracks
Cracks that run through the full laminate thickness, particularly near high-stress areas like the transom, keel attachment, or chainplates, are structural failures. They require professional assessment and repair.
Quick diagnostic tools
- Moisture meter: reads laminate moisture content; readings above 20% suggest water intrusion.
- Tap test: use a coin or small hammer and listen for a dull thud vs. a crisp ring. Dull = delamination.
- Sharp probe: gently probe around damage edges for soft spots.
- Straightedge: check for hull distortion or unfair surfaces that suggest core compression.
- Flashlight at a low angle: reveals surface crazing and stress patterns invisible in direct light.
| Damage type | DIY okay? | Red flags — call a pro |
|---|---|---|
| Gelcoat scratch/chip | Yes | Crack reappears after filling |
| Stress cracks (surface) | Yes, with care | Starburst pattern, recurring cracks |
| Small puncture (above waterline, solid hull) | Yes | Near through-hull, transom, or keel |
| Osmotic blisters (minor) | Possible | Widespread, laminate involved |
| Delamination / core damage | No | Any soft spot, moisture meter >20% |
| Structural crack | No | Any full-thickness crack |
Step-by-step DIY fibreglass repairs for common small jobs
This section covers three owner-appropriate repairs: gelcoat scratch polishing, small chip or puncture patching above the waterline, and a single-layer laminate patch on a solid hull. These techniques work on damage up to roughly 3–4 inches in diameter on non-cored, above-waterline surfaces. DIY repair kits typically include resin, hardener, and fiberglass cloth — suitable for small holes and cosmetic repairs, though color matching and below-waterline sealing remain difficult for most DIYers.
Job 1: Gelcoat scratch or surface polish
- Clean the area with acetone or isopropyl alcohol on a clean rag. Remove all wax, grease, and salt residue.
- Wet-sand with 400-grit wet/dry paper, working in small circles. Progress to 600, then 800 grit until the scratch is no longer visible as a groove.
- Apply gelcoat paste (color-matched to your hull) with a small spreader if the scratch has removed gelcoat material. Overfill slightly.
- Allow to cure per the product instructions — typically 2–4 hours at 70°F.
- Block-sand the cured patch level with 400-grit, then 600, 800, 1000, and 1500 grit.
- Compound and polish with a dual-action orbital polisher and marine cutting compound, finishing with a marine polish.
Job 2: Small chip or puncture patch (above waterline, solid hull)
- Dry the area completely — minimum 24 hours in sun or with a heat gun on low.
- Grind back the damaged gelcoat and laminate to clean, sound material using a 36-grit disc on an angle grinder or die grinder. Feather the edges.
- Wipe with acetone and let flash off fully.
- Cut fiberglass cloth (1.5 oz mat or 6 oz woven cloth) slightly larger than the void.
- Mix marine epoxy or polyester resin per the manufacturer’s ratio — this is critical. West System 105/205 or TotalBoat Thickened Epoxy are reliable choices. Get the ratio wrong and the patch will stay tacky or never reach full strength.
- Wet out the cloth, press into the void, and work out air bubbles with a plastic spreader or roller.
- Allow to cure fully (typically 24 hours for epoxy at 70°F) before sanding.
- Fair and finish with gelcoat paste, then sand and polish as in Job 1.
Job 3: Single-layer laminate patch (small area, solid hull)
Follow the same steps as Job 2, but build up two to three layers of 6 oz woven cloth or 1708 biaxial cloth, allowing each layer to reach a “green cure” (firm but not fully hard) before applying the next. This improves interlaminar bonding.
Tools and materials checklist
- Angle grinder with 36-grit and 80-grit discs
- Dual-action orbital sander
- Wet/dry sandpaper: 80, 120, 220, 400, 600, 800, 1000, 1500 grit
- Marine epoxy (West System, TotalBoat) or polyester resin for cosmetic work
- Fiberglass cloth: 1.5 oz mat, 6 oz woven, or 1708 biaxial
- Gelcoat paste (color-matched)
- Mixing cups and stir sticks (graduated for accurate ratios)
- Plastic spreaders and foam rollers
- Acetone for surface prep
- PPE: nitrile gloves, safety glasses, P100 respirator, long sleeves
Pro Tip: Color-matching gelcoat is genuinely hard. Gelcoat fades and oxidizes over time, so a factory-matched color will almost always look slightly off on an aged hull. Mix in small test batches, apply to a hidden area, and let it cure fully before committing — cured color differs from wet color. If the repair is on a visible topsides surface, a professional spray booth finish is worth the cost.
Why structural and cored-hull repairs usually need a professional
Structural fibreglass work isn’t just about filling a hole — it’s about restoring the load-bearing capacity of a laminate that was engineered to specific thickness and fiber orientation. That’s a different discipline from cosmetic patching, and getting it wrong has real consequences on the water.
The professional workflow for structural repairs follows a defined sequence:
- Full diagnostics: moisture meter survey, tap test mapping, and sometimes thermal imaging to locate the full extent of delamination or core saturation.
- Grinding to sound laminate: all damaged, wet, or delaminated material is removed until the grinder reaches solid, dry laminate throughout.
- Scarfing: the repair boundary is ground to a feathered taper. A scarf ratio of at least 12:1 is the widely accepted standard, — meaning for every 1mm of laminate thickness, the scarf extends 12mm outward. Skipping this concentrates stress at the repair edge and causes early failure.
- Layup: reinforcement layers are applied in the correct sequence, fiber orientation, and resin system. Wet-out technique and interlayer cure times are documented.
- Fairing: the repaired surface is built up with fairing compound and block-sanded to match the original hull form.
- Finishing: primer, gelcoat or paint, and a barrier coat for any below-waterline work.
Red flags that mandate professional help
- Any soft spot or spongy feel in the surrounding laminate
- Flexing under moderate hand pressure
- Damage within 12 inches of a through-hull fitting, keel bolt, or chainplate
- Transom or stringer damage (these are primary load-bearing structures)
- Moisture meter readings above 20% over a wide area
- Blistering that extends below the gelcoat into the laminate
Structural repairs typically run from a few hundred dollars for a small laminate rebuild to several thousand for transom replacement or extensive core work. Major structural or core repairs can reach five figures depending on the extent of damage — a realistic budget anchor when you’re deciding whether to address damage now or let it worsen.
How do you choose the right resin and materials for the job?
The short answer: polyester resin for above-waterline cosmetic work, epoxy for structural and below-waterline repairs, and vinylester as a capable middle ground. Each has a place, and using the wrong one is a common and costly mistake.
Resin comparison
Epoxy costs more than polyester but offers better water resistance and is the right choice for below-waterline or structural repairs. Polyester is fine for gelcoat work and above-waterline cosmetic patches where moisture resistance isn’t the primary concern.
Fiberglass cloth types
- 1.5 oz chopped strand mat (CSM): good for filling voids and building thickness; bonds well with polyester but poorly with epoxy.
- 6 oz woven cloth: clean, strong, and easy to wet out; good for surface layers and small patches.
- 1708 biaxial cloth: 17 oz biaxial stitched with 8 oz mat backing; the workhorse for structural repairs and transom rebuilds.
- Woven roving: heavy, coarse fabric for rapid thickness buildup in large structural repairs.
Gelcoat, fillers, and barrier coats
Gelcoat is the boat’s outer skin — pigmented, UV-resistant, and polishable — but it is porous and not a true moisture barrier. Below the waterline, always apply an epoxy barrier coat over the repair before returning to service. Skipping this step on a below-waterline patch is the single most common reason blisters recur.
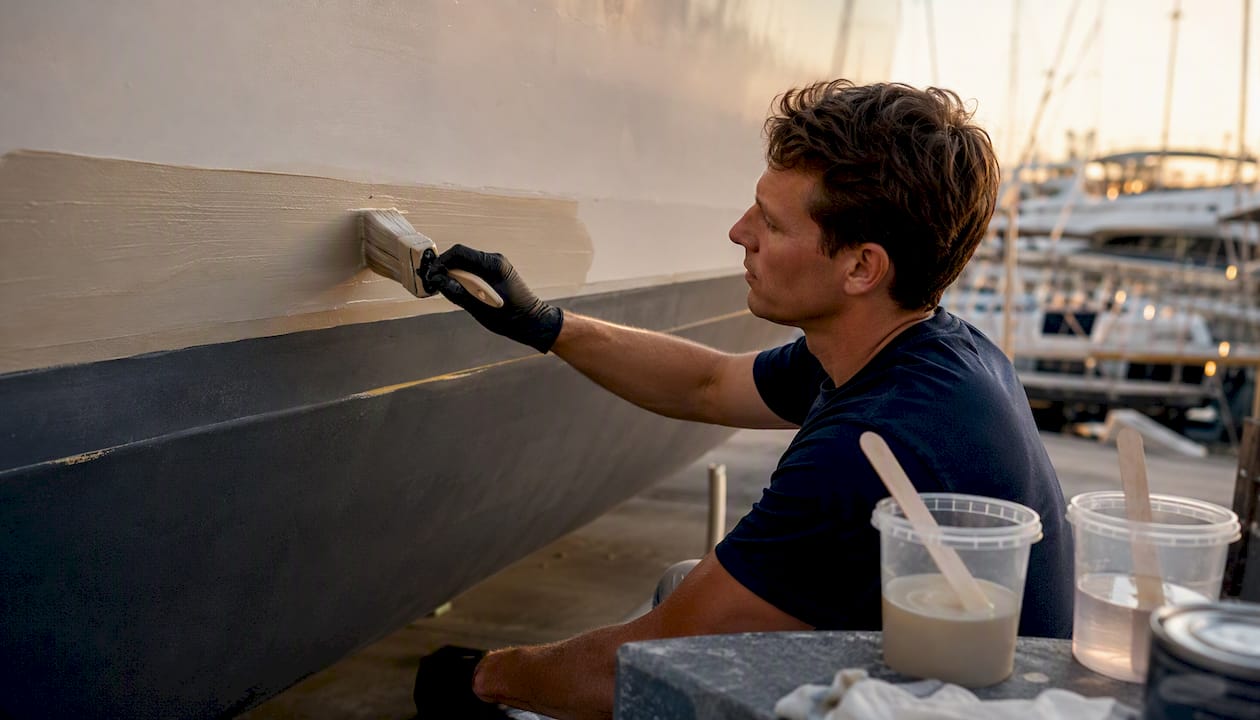
For filling and fairing, marine-grade fairing compounds (such as those in the West System or TotalBoat product lines) are formulated to sand cleanly and resist moisture better than automotive body fillers.
Named products worth knowing
- West System 105/205 or 105/206: the benchmark marine epoxy system, widely available at West Marine and online. Excellent for structural work and barrier coats.
- TotalBoat Thickened Epoxy or TotalBoat Wet Edge: reliable mid-price options for DIY repairs and topside finishing.
- J-B Weld MarineWeld: a two-part epoxy paste suited for small, non-structural repairs and emergency fixes. Not a substitute for proper laminate work on structural areas.
For small craft and PWC repairs, marine maintenance resources covering resin selection and repair basics can help you cross-reference material choices before you buy.
Safety, curing conditions, and ventilation — getting this right matters
A repair that cures in the wrong conditions will fail. Temperature, humidity, catalyst ratio, and ventilation aren’t optional details — they determine whether your patch reaches its rated strength or stays a soft, tacky liability.
PPE and ventilation checklist
- Respirator: a half-face respirator with organic vapor cartridges (OV/P100) is mandatory when working with polyester resin (styrene vapors are significant) and recommended for epoxy. A dust mask is not sufficient.
- Nitrile gloves: change them frequently. Epoxy sensitization is cumulative — repeated skin contact can cause a permanent allergy.
- Safety glasses or goggles: resin splatter and fiberglass dust are both serious eye hazards.
- Long sleeves and disposable coveralls: fiberglass dust causes skin irritation that can last hours.
- Ventilation: work outdoors or with forced-air ventilation. Polyester resin releases styrene, which is harmful in enclosed spaces. Epoxy is preferable for any indoor or enclosed-space repair.
Curing conditions
Below 50°F, many systems cure too slowly or incompletely. Above 90°F, pot life shortens dramatically and you risk exothermic runoff in large mixed batches. Polyester resin is more temperature-sensitive and should not be applied in direct sun on a hot hull surface.
Too little and the resin stays tacky; too much and it cures too fast, generating heat and potentially cracking. Always follow the manufacturer’s data sheet exactly.
Disposal of fibreglass repair waste
Cured resin and trimmed fiberglass cloth can generally be disposed of as solid waste in most U.S. municipal waste streams, but uncured resin and solvent-soaked rags are hazardous materials and must be handled per your local regulations. Never pour uncured resin down a drain. Allow small amounts of leftover catalyzed resin to cure fully in a well-ventilated area before disposal. Check your county’s hazardous household waste program for drop-off options — most Florida counties run regular collection events.
What do fibreglass repairs actually cost, and how long do they take?
Budget and scheduling reality varies widely depending on damage severity, resin choice, and whether you’re doing the work yourself or hiring a shop. Here’s a practical breakdown.
Minor gelcoat and cosmetic repairs can run under a few hundred dollars, while major structural or core repairs can reach several thousand to five figures depending on extent. The gap between DIY and professional cost is real, but so is the risk of a failed DIY repair that costs more to undo than the original damage.
A few factors that shift costs significantly: shop hourly rates in South Florida tend to run higher than national averages given the concentration of premium yards; epoxy-based repairs cost more in materials than polyester but typically last longer; and cored-hull work almost always runs over initial estimates because the full extent of core saturation isn’t visible until the outer skin is removed.
For osmosis and blister work specifically, full peel-and-barrier strategies require drying time measured in weeks to months — plan your dock space and haul schedule accordingly, especially heading into Florida’s summer storm season.
How do you find and vet a fibreglass repair shop in the U.S.?
The three non-negotiable criteria when hiring a shop: ABYC certification, a climate-controlled workspace, and a documented portfolio with warranty terms. Everything else is secondary.
Professional shops use climate-controlled spaces and documented layup schedules for durable results. An outdoor repair in Florida’s summer heat and humidity is a recipe for a compromised cure, regardless of how skilled the technician is.
Vetting checklist
- ABYC certification: ask specifically for ABYC-certified technicians. This is the marine industry’s recognized competency standard in the U.S.
- Climate-controlled workspace: the shop should be able to control temperature and humidity during cure cycles, not just during application.
- Portfolio: request photos of completed repairs similar in scope to yours. A shop that can’t show you finished work has no track record to evaluate.
- Written scope of work: get a detailed written estimate that specifies materials, resin system, layup schedule, and warranty terms before signing anything.
- References: ask for two or three recent clients you can contact directly.
Questions to ask before you commit
- What resin system will you use, and why is it appropriate for this repair?
- What is your layup schedule, and how do you document interlayer cure times?
- How do you verify the repair is watertight before the boat goes back in the water?
- What is your warranty on structural repairs, and what does it cover?
- Do you have ABYC-certified technicians on staff?
Red flags to walk away from
- No portfolio or “we don’t keep photos”
- Vague timeline (“a few weeks, maybe”)
- No written warranty or “we stand behind our work” with nothing in writing
- Repairs done outdoors in all weather
- Pressure to approve work before a written estimate is provided
For Florida owners, Mazzamarine’s local fibreglass repair guide for Miami covers the specific questions to ask South Florida yards and what to expect from the regional market.
How Mazzamarine handles fibreglass repairs
Mazzamarine approaches every fibreglass repair with a structured, diagnostic-first workflow: full moisture survey and tap-test mapping, controlled scarfing to sound laminate, a documented layup schedule, climate-managed cure, and color-matched gelcoat finish. No guesswork, no shortcuts on the scarf ratio,
The repair workflow follows the industry-standard sequence:
- Inspection: moisture meter survey, tap test, and visual mapping of the full damage extent before any grinding begins.
- Preparation: grinding to clean, dry laminate with proper feathered scarfing at the repair boundary.
- Layup: reinforcement layers applied in the correct sequence and fiber orientation, with documented interlayer cure times.
- Fairing: marine fairing compound applied and block-sanded to restore the original hull form.
- Finish: color-matched gelcoat or paint, with epoxy barrier coat on all below-waterline work.
Typical repairs Mazzamarine handles through its Florida network include transom rebuilds, full blister peel and barrier coat treatments, structural laminate rebuilds after impact damage, and paint, hull, and gelcoat refinishing for both cosmetic and protective purposes. The network also covers fibreglass upgrades and damage repair for owners looking to address multiple issues in a single haul.
To request an estimate, photograph the damage clearly, note the boat’s age and hull construction (solid or cored), and contact Mazzamarine directly. The team will assess scope and connect you with the right specialist in the Florida network.
Cleanup and proper disposal of fibreglass repair waste
Cleanup after a fibreglass repair deserves the same care as the repair itself. The materials involved — resins, solvents, catalysts, and fiberglass dust — carry real environmental and health risks if handled carelessly.
During the job: keep a dedicated waste container for resin-soaked rags, mixing cups, and used rollers. Never leave these in a pile — spontaneous combustion is a genuine risk with solvent-soaked materials, particularly in warm Florida conditions. Spread used rags flat outdoors to dry before disposal, or submerge them in water in a metal container.
Leftover catalyzed resin: if you have mixed resin left over, pour it into a shallow cardboard box or onto a piece of cardboard to increase surface area and allow it to cure safely. Never leave a large mass of catalyzed resin in a mixing cup — the exothermic reaction in a concentrated mass can generate enough heat to start a fire.
Cured waste: once fully cured, fiberglass cloth scraps, sanding dust, and hardened resin can typically be bagged and disposed of as solid waste in most U.S. municipal programs. Check your local guidelines, as some counties classify fiberglass dust as a regulated waste.
Uncured resin and solvents: these are hazardous. Acetone, MEKP catalyst, and uncured resin must never go down a drain or into regular trash. Most Florida counties operate hazardous household waste (HHW) collection programs — Miami-Dade, Broward, and Palm Beach counties all run regular drop-off events. Contact your county’s solid waste department for current schedules.
Fiberglass dust: always vacuum or wet-wipe fiberglass dust rather than blowing it with compressed air. Respirable glass fibers are a lung hazard. Dispose of vacuum bags as solid waste, sealed in a plastic bag.
For small craft owners looking at marine maintenance best practices beyond fibreglass, IPD Racing’s marine traction and maintenance resources cover complementary care topics for PWCs and small boats.
A technician’s honest take on fibreglass repairs
The most expensive mistake I see boat owners make isn’t attempting a DIY repair — it’s attempting the wrong DIY repair. A gelcoat chip patched with the right kit and a little patience? That’s satisfying work, and it protects the laminate underneath. But a transom that’s been “fixed” with a tube of J-B Weld and a coat of paint over soft, wet core? That’s a liability on the water and a much bigger bill when it finally comes apart.
The other thing worth saying plainly: patience is the actual skill in fibreglass work. The repair that fails is almost always the one that got sanded too soon, painted before the cure was complete, or rushed back into the water before the barrier coat had time to do its job. The chemistry doesn’t care about your launch date.
Professional shops matter most not because they have better hands, but because they have controlled environments, documented processes, and the experience to know what they don’t know — which is when to stop grinding and call in a specialist for the core work underneath.
Ready to get your boat back on the water?
When the damage goes beyond a weekend patch job, Mazzamarine is the Florida network built for exactly this situation. Climate-controlled cure environments, ABYC-aware technicians, and a documented layup process mean your repair holds up to South Florida’s heat, salt, and UV — not just for one season, but for years.

Getting started takes three steps: photograph the damage clearly and note your hull construction, reach out to Mazzamarine for a scope assessment, and schedule your haul with a specialist matched to your repair type. Whether it’s a transom rebuild, a full blister peel and barrier treatment, or a color-matched gelcoat refinish, the network has the right hands for the job.
Check the signs you need yacht repairs guide to confirm your repair priority, or go straight to the marine repair service guide to request an estimate and get your boat back where it belongs.
Sources
- Common errors in fiberglass laminate repair — Epoxyworks
- Fiberglass Boat Repair: Costs, Process & Finding the Right Shop | Boatyards.com
- How Much Does It Cost to Repair Fiberglass Hull | Boat Genesis
Recommended
Text or Call 954-330-9653 Schedule Appointment
Mazza Marine Yacht Services & Refit

Fiberglass Upgrades and Damage Repair

Premium Yacht Paint/ Faux Teak

Fishing: Custom Rods, Reels,Tackle

Electrical, Electronics and Navigation

Paint, Hull and Gelcoat

Teak Decks, Wood Cabinets, Carpentry

Canvas, Enclosures and Upholstery

Mechanical, Repower and Running Gear

Plumbing, Bilge and Thru-Hulls

Welding and Custom Fabrication

Interior Refit And Past Work
Get your yacht value Estimate
"*" indicates required fields