
View Our Recent Work:

Budget $300 to $700 in parts and labor for a straightforward below-waterline thru-hull replacement, and closer to $150 to $400 when a forum-quoted, simple single-fitting job goes smoothly with good access. Flush mounts, buried access behind cabinetry, or a required haul-out push the total cost substantially higher per fitting. Most owners are better off hiring a marine professional for anything below the waterline. A leak here does not give you a second chance.
TL;DR:
- Most below-waterline thru-hull replacement costs between $300 and $900, largely depending on access, material selection, and whether haul-out is required.
- Labor costs are the biggest driver, with shop rates of $75 to $130 per hour, and straightforward jobs typically taking 1 to 3 hours per fitting.
- Access issues, such as interior obstructions and mounting style, are the primary reasons for significant quote variations between yards.
- Bronze fittings are recommended for longevity, but Marelon offers corrosion peace of mind at the expense of more complex installation.
- Owners should request detailed, line-item quotes with clear descriptions of parts, labor, haul-out, and testing to avoid surprises and accurately compare prices.
Table of Contents
- What Drives Thru-Hull Installation Cost
- Why Quotes Vary So Much Between Yards
- DIY vs. Professional Thru-Hull Installation
- How to Get an Accurate Quote
- Field Notes: What These Jobs Actually Look Like
- Realistic Budgets, Buyer Judgment: The Editorial Take
- Get a Firm Thru-Hull Quote
- Sources
What Drives Thru-Hull Installation Cost
The number on your invoice depends on three separate line items that rarely move together: the fitting itself, the labor to install it correctly, and whatever it takes to get the boat out of the water and back in. Owners who understand these three buckets stop getting surprised by quotes.
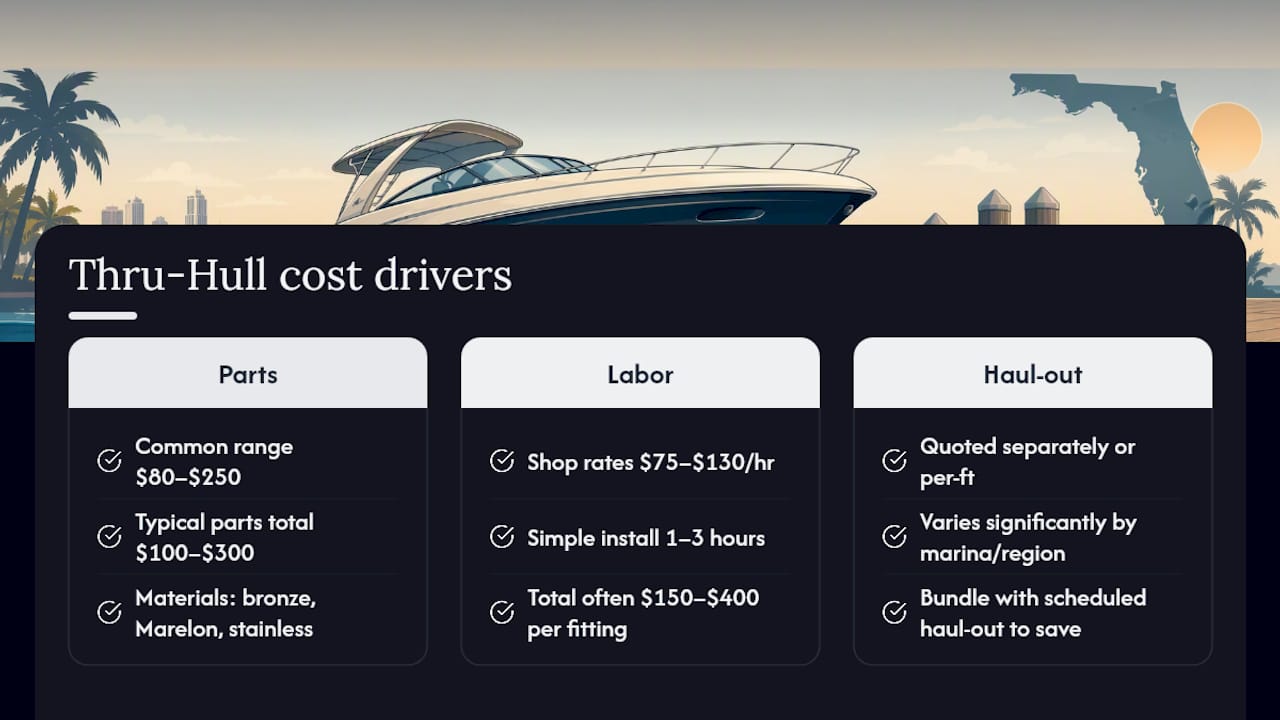
Parts are the smallest slice of most jobs, but the spread is wide. A bronze or DZR (dezincification resistant) bronze seacock in a common size runs somewhere in the range of $80 to $250 depending on diameter and whether it is a full flanged seacock assembly or a simpler ball valve fitting. Marelon composite units typically land in a similar band, sometimes slightly less for the fitting itself, though the fittings themselves tend to be bulkier and can demand more careful fitting in tight quarters. Stainless steel thru-hulls sit at a comparable or slightly higher price point to bronze, and cheap brass hardware, which should never go below the waterline, is the cheapest option and also the one you should walk away from. Add hose, barbs, stainless clamps, and bedding compound, and parts for a single fitting commonly total $100 to $300 before labor touches the boat.
Labor is where most of the real money lives. Shop labor rates in the marine trades commonly range from $75 to $130 per hour depending on region and yard overhead, with some specialized rigging or fabrication work billed higher. A straightforward, surface-mounted thru-hull with clear access typically takes 1 to 3 hours per fitting. That is why forum and yard reports commonly place a simple below-waterline seacock replacement at $150 to $400 total when access is good and nothing unexpected turns up. Flush-mounted fittings or anything requiring interior disassembly can run 2 to 6 hours or more per fitting, and that time compounds fast when a tech has to stop, remove joinery, then start the actual plumbing work.
Haul-out and launch costs apply whenever the fitting sits below the waterline and can’t be reached with the boat in a slip using a diver or careful scheduling. Yards typically quote haul-out separately from installation labor, often as a per-foot charge, and that figure varies significantly by marina and region. Some yards bundle blocking, the lift itself, and a pressure test into one haul-out line; others itemize each piece. If you already have a haul-out scheduled for bottom paint or running gear work, that is the time to knock out thru-hull replacements, because you are not paying for a second lift.
Accessory and hidden material costs
Beyond the fitting and the labor hour, three smaller cost centers show up on almost every real invoice:
- Backing plates: G10 composite or epoxy-bonded plywood blocks, typically $20 to $80 in material per fitting plus the labor to bed and glass them in
- Fairing and gelcoat work: required whenever a flush-mount fitting changes the hull’s exterior profile, often $100 to $400 depending on hull curvature and paint match
- Replacement hose runs: if the old hose has hardened or cracked, expect to replace it rather than reuse it, adding $20 to $60 per run in material
- Sealant and consumables: marine polysulfide or polyurethane bedding compound, tape, and disposal fees, usually a modest line item but one that adds up across multiple fittings
- Contingency: a reasonable yard will build in 10% to 15% for the unknown, particularly on older hulls where corrosion or delamination sometimes hides behind the fitting
Putting this together into representative totals helps more than any single number. An easy surface-mounted drain fitting with good access and no haul-out required, done at the dock by a technician, lands around $150 to $350 in parts and labor. A below-waterline seacock replacement with a new backing plate, requiring a haul-out and standard bronze hardware, runs $500 to $900 once you add the lift, blocking, and pressure test. A flush-mounted intake requiring fairing and paint match, the kind of job that shows up on performance sportfish hulls with recessed transducers or pickups, commonly runs $1,000 to $1,800 once fiberglass work and finish coats are factored in. Multi-fitting jobs, where a yard replaces six or eight thru-hulls in one haul-out, often see meaningful per-unit labor efficiencies since the boat is already out of the water and the crew is already set up.
Why Quotes Vary So Much Between Yards
Two boats with identical fittings can generate wildly different quotes, and access is almost always the reason. A thru-hull sitting behind an open bilge is a one-hour job. The same size fitting behind a built-in settee, a fuel tank, or a wiring bundle can triple the labor time once a technician has to remove and reinstall interior joinery just to reach it. Ask any yard foreman which line item blows past estimates most often, and access work tops the list every time.
Flush versus surface mounting is the second big lever. A surface-mounted fitting sits proud of the hull and installs relatively quickly. A flush-mounted fitting, common on performance hulls where a proud fitting would create drag or catch debris, requires fiberglass fairing work around the opening and a paint or gelcoat match afterward. That finishing work alone can add several hundred dollars to a job that would otherwise be simple.
Material choice affects both the parts bill and the long-term cost of ownership. Bronze and DZR bronze remain the standard recommendation below the waterline because of their track record for longevity, even though the parts cost is often a bit higher than composite. Marelon reduces galvanic corrosion risk since it’s non-metallic and can’t participate in electrolytic reactions between dissimilar metals, but the fittings run bulkier, which can complicate installation in a cramped bilge. Stainless has fans, but it is vulnerable to crevice corrosion in low-oxygen, wet environments, exactly the condition a below-waterline fitting sits in permanently. Cheap brass is the one material that should never appear below the waterline; it dezincifies and fails quietly, often with no external warning before it lets go.
Backing plates matter more than most owners realize until a surveyor flags one. Production boats frequently ship with unflanged seacocks and no proper backing plate at all, relying on hull thickness alone for support. Upgrading to a flanged seacock bonded to a G10 or epoxy-encapsulated plywood backing plate is widely considered the correct, once-and-done fix, and it is exactly the kind of upgrade a surveyor will note if it is missing.
Speaking of surveyors: insurance underwriters increasingly require thru-hull and seacock inspection as part of a pre-purchase or renewal survey, and a surveyor who flags corroded, frozen, or unflanged fittings can force replacement before a policy binds. That requirement often pushes owners toward higher-spec parts than they might have chosen on their own, since insurers rarely accept a brass patch job as an acceptable fix.
Pro Tip: If your survey report flags “thru-hulls in fair condition, recommend inspection,” read that as a soft warning. Get an actual haul-out inspection before your renewal date, not after, so you control the timeline instead of your insurer.
- Interior access issues are the single biggest unpredictable cost driver on any quote
- Flush mounts always cost more than surface mounts once fairing and finish work enter the picture
- Bronze remains the longevity benchmark below the waterline; Marelon trades some fit complexity for corrosion peace of mind
- A missing or undersized backing plate is a common surveyor flag that forces an upgrade
- Insurance renewal surveys are increasingly the trigger that starts a thru-hull project, not owner initiative
DIY vs. Professional Thru-Hull Installation
A DIY thru-hull replacement can look attractive on paper. Parts alone for a single fitting, hose, clamps, and bedding compound might run $150 to $350, and if you already own a hole saw, a bevel tool, and basic hand tools, the incremental cost looks small. Time is the real expense: a first-timer working carefully through a below-waterline replacement, including haul-out coordination, cure time for bedding compound, and a proper pressure test, often spends a full weekend on what a professional crew handles in a few hours.
Compare that to professional labor. A yard doing the identical job, with a technician who has installed dozens of these fittings, typically prices it at 1 to 3 hours of shop time for a straightforward surface-mount job, more for anything flush or access-restricted. The gap between a DIYer’s estimated time and actual time is almost always driven by two things: underestimating access difficulty and discovering corroded fasteners or a soft, delaminated hull section once the old fitting comes out. Neither surprise is rare on a boat over 15 years old.
If you are weighing the DIY route, walk through this checklist before committing:
- Never bed a thru-hull with silicone. Silicone leaves a film that prevents future sealant from adhering properly, which turns a future repair into a scraping nightmare. Use marine polysulfide or polyurethane instead.
- Always install a proper backing plate, not just hull laminate, for any fitting that carries mechanical load from a valve handle or hose barb.
- Never use plain brass below the waterline. It looks fine for years, then dezincifies and fails without warning.
- Pressure test or at least thoroughly leak-test every new installation before relaunching, and document that you did.
- Know when to stop and call a pro: engine cooling water intakes, any fitting in a corroded or soft hull section, and anything an insurer specifically flagged on a survey are jobs where a mistake sinks the boat, not just the budget.
For those last categories, hiring a professional is not really optional. If your marine survey noted delamination or fastener corrosion near a thru-hull, that section of hull may need structural repair alongside the fitting itself, and that is well outside typical DIY scope. Emergency situations, where a fitting is actively failing, deserve an emergency repair response rather than a weekend project.
How to Get an Accurate Quote
Vague quotes create disputes. The fix is arming yourself with enough information that a yard can give you a firm number instead of a padded estimate that protects them against the unknown.
Before you call around, gather clear photos of the fitting location from both inside and outside the hull, measurements of the fitting diameter, your hull material (fiberglass, wood, or metal changes the installation method significantly), and any relevant notes from a recent survey. A tech who can see the actual bilge access before quoting will give you a far tighter number than one working off a phone description.
Ask every yard to break the quote into the same line items so you can compare apples to apples:
- Parts (fitting, valve, hose, clamps, backing plate material) listed by name and size
- Labor hours, stated as a number, not just a lump sum
- Haul-out, blocking, and launch charges if applicable
- Fairing or gelcoat work if the fitting is flush-mounted
- Testing and documentation, including whether they provide a written pressure-test or leak-test record
Pro Tip: Ask directly, “What’s your labor-hour estimate, and what happens if it runs over?” A yard with confidence in its own process will give you a straight answer. One that dodges the question is telling you something.
Treat a few patterns as red flags. A single lump-sum number with no parts breakdown tells you nothing about what you are actually paying for. Vague labor-hour ranges, like “a few hours, give or take,” are an invitation to a surprise final bill. And any yard that will not commit to some form of warranty language, even a simple one-year workmanship guarantee, is worth a second phone call to a competitor. Separating parts, labor, haul-out, and testing into distinct line items is standard good practice and it is the single best habit for avoiding post-job arguments over what was actually included.
Field Notes: What These Jobs Actually Look Like
Most thru-hull calls we take fall into a handful of repeatable patterns. A galley or head sink drain replacement is usually the easiest ticket: surface-mounted, decent access, done in an afternoon. A cockpit drain or livewell pickup on a sportfish often needs a backing plate that was never installed correctly the first time around, which turns a simple swap into a small fiberglass job. Engine raw-water intakes are the ones that get real attention, because a mistake there does not just leak, it can starve a running engine of cooling water.
The add-ons that surprise owners most are rarely the fitting itself. It is the epoxy for a proper backing plate bond, a hose run that turns out to be too brittle to reuse, or interior joinery that has to come out and go back cleanly rather than get forced. Our crews spec bronze or Marelon depending on location and access, always insist on a bonded backing plate rather than relying on hull laminate alone, and never bed a fitting with anything but proper marine sealant. Where access is the problem, we plan the disassembly step up front in the quote instead of discovering it mid-job, which is exactly the kind of surprise a good line-item estimate is supposed to prevent.
- Sink and cockpit drains: usually the fastest, least expensive category
- Livewell and baitwell pickups: frequently need a backing plate upgrade during the swap
- Engine cooling intakes: highest stakes, always professional-only work
- Flush-mounted transducer or intake housings: the category most likely to need fairing and paint match
Realistic Budgets, Buyer Judgment: The Editorial Take
The conventional advice on this topic treats thru-hull cost like a fixed catalog price, and that is the biggest disservice to owners trying to budget honestly. The fitting itself is almost never the expensive part. Access, mounting style, and whatever a surveyor decides to flag are what actually move a job from $300 to $1,500.
Where most guides fall short is pretending every quote should look the same. It should not. A tight, well-organized bilge and a cramped one behind three layers of cabinetry are different jobs wearing the same part number, and a yard that quotes them identically is either guessing or padding for risk it hasn’t disclosed.
If you take one thing from this, prioritize the line-item quote over the lowest number. A vague lump sum that looks cheap today is where the arguments and change orders live later. Ask for hours, ask for material specs, ask what happens if the fitting underneath is worse than expected. That question, more than any material choice, is what separates a smooth thru-hull job from an expensive one.
— Jason
Get a Firm Thru-Hull Quote
Some Florida service providers offer owners a line-item estimate built from an actual look at your fittings, not a guess made over the phone. Thru-hull installs, backing plate upgrades, and haul-out coordination are sometimes handled as part of broader maintenance and refit work, allowing owners to work with the same team whether the job is a single drain swap or a full seacock upgrade across the hull.

Reach out and send photos and measurements of the fitting locations, along with any survey notes you have. That gets you a firm, line-item quote faster than scheduling a site visit blind, and it means fewer surprises once the boat is on the lift. If a fitting is actively leaking right now, our emergency repair service is built for exactly that call. Otherwise, contact Mazzamarine to schedule a site visit and get a written estimate before your next haul-out.
Sources
For material specs and galvanic behavior between bronze, Marelon, and stainless, the Practical Boat Owner guide to replacing aging through-hull fittings covers the trade-offs clearly. Marine How To’s seacock replacement guide walks through flanged seacock and backing plate installation step by step. For backing plate fabrication materials, see WJ Prototypes’ sheet metal materials reference.
- Thru hulls and seacocks | Trawler Forum
- How to replace ageing through-hull fittings (PBO)
- Replacing Thru-Hulls and Seacocks | Marine How To
Recommended
Text or Call 954-330-9653 Schedule Appointment
Mazza Marine Yacht Services & Refit

Fiberglass Upgrades and Damage Repair

Premium Yacht Paint/ Faux Teak

Fishing: Custom Rods, Reels,Tackle

Electrical, Electronics and Navigation

Paint, Hull and Gelcoat

Teak Decks, Wood Cabinets, Carpentry

Canvas, Enclosures and Upholstery

Mechanical, Repower and Running Gear

Plumbing, Bilge and Thru-Hulls

Welding and Custom Fabrication

Interior Refit And Past Work
Get your yacht value Estimate
"*" indicates required fields