
View Our Recent Work:

For most boats, hiring a professional for watermaker installation is the right call, and the numbers back that up: a properly planned install runs 1 to 5 days depending on system size, with labor typically landing between $500 and $5,000 before parts and custom fabrication. DIY works fine for a simple portable unit if you already have solid electrical and plumbing chops. Anything permanent, with thru-hulls, dedicated wiring, and a high-pressure pump bolted into a hull, deserves a professional hand.
Three things are non-negotiable no matter who does the work: a dedicated seawater intake separate from any other system, prefilters you can reach and service without tools, and correct electrical bonding to prevent galvanic corrosion. Skip any one of these and you’re signing up for repeat service calls.
- Dedicated intake, not a shared thru-hull
- Prefilters accessible in under 60 seconds
- Proper wire sizing and bonding at every metal connection
Pro Tip: Budget an extra day in your timeline for pickling and salinity testing before you trust the system for offshore use.
Key Takeaways
Watermaker installation succeeds or fails based on three fixed points: a dedicated intake, prefilters serviceable in under 60 seconds, and correct electrical bonding throughout the seawater path.
| Point | Details |
|---|---|
| Hire a pro for permanent installs | DIY suits portable units only; permanent systems need professional thru-hull and electrical work. |
| Size for real usage, not boat length | A modest upsize reduces run-hours and lowers lifecycle wear on the pump and membrane. |
| Never share a thru-hull | A dedicated scoop-type intake prevents most cavitation and contamination complaints. |
| Commission before you trust it | Flush, test salinity, verify pressure, and log baseline readings on the first run. |
| Mazzamarine handles full-scope installs | Thru-hull cutting, electrical integration, and custom mounting are handled together in Florida. |
Manufacturer Manuals and Field Guides Worth Reading
- Rainman watermaker installation guidelines covers intake sizing, plumbing order, and pickling steps.
- Spectra Farallon installation manual details mounting, temperature limits, and commissioning.
- ECHOTec’s field guide on installation mistakes documents common failures and fixes.
- Halden Marine’s membrane care guide explains pickling and membrane lifespan expectations.
Table of Contents
- Plan Before You Cut: Sizing, Power, and Service Access
- Where Should the Seawater Intake Go?
- How Should You Route the Plumbing?
- Getting the Electrical and Mounting Right
- What Does Commissioning Look Like?
- What Mistakes Show Up Most Often?
- Sources
Plan Before You Cut: Sizing, Power, and Service Access
Every watermaker installation mistake we’ve seen traces back to a decision made before anyone picked up a drill. Sizing is the first one. Match gallons-per-hour (GPH) output to your actual water use, not your boat’s length. A couple who showers on deck and cooks simple meals needs far less capacity than a live-aboard family running a washer/dryer combo.
Undersizing to save money on the front end is a classic false economy. Owners who buy a smaller unit than they need often run it for hours longer per day, which accelerates wear on the pump and membrane and shortens the interval between rebuilds. A modest upsize almost always pays for itself in reduced run-hours.
Power planning comes next. Most systems run on 12V or 24V DC, though larger vessels often step up to 110V AC or an engine-driven pump for higher output. Energy-recovery designs cut electrical draw by roughly 20 to 30 percent compared to standard systems, which matters if your battery bank is already stretched thin running electronics and refrigeration.
Layout planning determines whether the system gets maintained or ignored. Here’s the sequence that works:
- Map the intake path first, since it dictates where the strainer and prefilters live.
- Place the high-pressure pump and membrane housing where you can slide the membrane out axially without disconnecting adjacent plumbing.
- Mount the control panel somewhere dry and visible, not buried behind a bilge access panel.
- Confirm you can change a filter cartridge in under 60 seconds without reaching for a toolbox. Installers who follow this rule consistently report far better long-term compliance with filter changes, because a filter that’s a hassle to reach becomes a filter nobody changes.
- Leave clearance behind the membrane housing equal to its full length, plus a few inches for hands and tools.
Order your spares before the installer shows up: extra prefilter cartridges, spare O-rings for every fitting, and pickling chemicals for storage prep. Nothing stalls a project faster than waiting on a part that should have shipped a week earlier.
Where Should the Seawater Intake Go?
A dedicated, forward-facing scoop-type thru-hull beats a shared intake every time. Sharing a raw-water intake with an air conditioner or engine cooling line invites air induction, sediment contamination, and cavitation, all of which show up as reduced output or a pump that struggles to build pressure.
Manufacturer guidelines call for a minimum intake diameter of 3/4 inch, sometimes 1 inch on higher-output systems. Every elbow, valve, and reducer you add between the thru-hull and the feed pump increases resistance, and that resistance is exactly what starves the pump and triggers cavitation.
- Mount the intake low in the hull, below the waterline at rest, away from exhaust outlets and scuppers where turbulence and bubbles get pulled in.
- Favor midship placement over bow mounting on boats that pound in a chop. A bow-mounted scoop pulls in more air when the hull is slamming.
- Consider a snorkel-style or retractable intake on faster craft, where a flush-mounted scoop can starve the pump at speed.
- Choose a strainer you can pull and clean without draining half the plumbing run.
Experienced installers keep the run from thru-hull to feed pump as short and straight as possible. Spectra’s own installation documentation backs this up, emphasizing a dedicated scoop intake placed low in the hull as a hard requirement, not a suggestion.
Pro Tip: If you’re retrofitting an older hull, check whether an existing unused thru-hull can be repurposed before cutting a new hole. It saves a step and often lines up better with your intended plumbing run.
How Should You Route the Plumbing?
Order matters more than most first-time installers expect. The sequence runs strainer, then feed/boost pump, then prefilters, then the high-pressure pump, then the membrane, then product water. Reverse or skip a stage and you risk sending unfiltered water into components that cost thousands to replace.
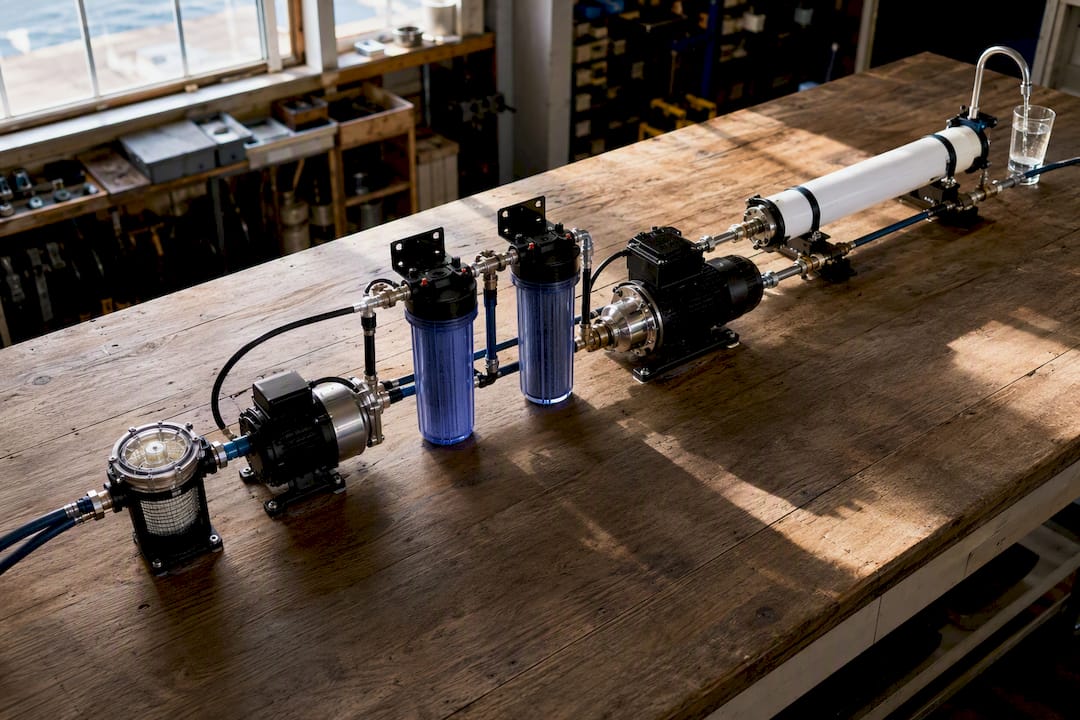
Filter housings need mounting orientation that allows cartridge removal without disturbing the hoses feeding them, and clearance equal to the cartridge’s length plus a hand’s width. High-pressure hose deserves real support brackets, not zip ties against a stringer. Tight coils resting against fiberglass or metal will chafe through insulation faster than you’d think.
Brine discharge routing trips up more installations than people expect. A few rules keep it simple:
- Keep the discharge point above the waterline where the boat’s design allows, and above the boot stripe when practical, since a submerged discharge adds lift and backpressure that the pump has to fight against on every cycle.
- Route with a steady downhill slope rather than looping the hose up and over obstacles.
- Avoid long runs and small-diameter fittings on the brine line. Both add backpressure that reduces membrane life over time.
For freshwater flushing, install a T-valve near the feed pump that lets you switch from raw water to a flush source, whether that’s a dedicated flush tank or a bucket for manual pickling. If you’re using tank water for flushing, add an inline carbon filter first. Chlorinated tank water is one of the fastest ways to damage a membrane, and it’s an easy problem to prevent with a $30 filter.
Getting the Electrical and Mounting Right
Wire sizing is where a lot of installs quietly go wrong. Undersized wire causes voltage drop, and voltage drop on a high-pressure pump motor means it works harder to reach the same output, generating heat and cutting motor life. Follow the manufacturer’s gauge chart for your specific run length rather than guessing based on the breaker rating.
- Bond every metal component in the seawater path, pump housings, seacocks, and fittings, to the boat’s common bonding system to prevent galvanic corrosion between dissimilar metals.
- Mount the pump and membrane module on shock-absorbing brackets. Vibration transmitted into a rigid mount fatigues fittings and hose connections over time.
- Route wiring and hoses away from belts, moving hatches, and anything that generates repeated flex.
- Keep the installation out of the hottest corner of the engine room. Membranes and pump seals have real temperature limits, and Spectra’s manuals specify strict mounting and temperature thresholds for exactly this reason.
- Use marine-rated waterproof connectors with drip loops, and leave enough slack that a technician can pull a connector for testing without disassembling the mount.
Cramped engine rooms are notorious for cooking components that were never designed to run at 130 degrees. If ventilation in your engine bay is already marginal, address that before adding another heat-sensitive system into the mix.
What Does Commissioning Look Like?
Commissioning is where you find out if the installation was actually done right, not just done. Skip this step and you’re troubleshooting blind the first time something goes wrong offshore.
- Run a full freshwater flush to clear any manufacturing residue or preservative solution before the first real cycle.
- Start the system and measure product water quality with a TDS meter or conductivity tester. Most systems should read well under 500 ppm on a clean first run; anything markedly higher points to a membrane or seal issue.
- Verify pressure and flow against the manufacturer’s spec sheet. A pump straining to reach normal operating pressure, or a noisy, grinding sound at startup, usually signals intake restriction or cavitation.
- Check every fitting for leaks under full operating pressure, not just at idle.
- Log your first-run readings: pressure, flow rate, salinity, and amp draw. Warranty claims and future troubleshooting both depend on having a baseline.
If output runs low or salinity spikes on that first test, check the intake strainer for restriction and confirm the prefilters aren’t already loaded from installation debris before assuming a bigger problem.
What Mistakes Show Up Most Often?
Shared thru-hulls cause more service calls than any other single decision. Swapping to a dedicated intake resolves most of the cavitation and contamination complaints we see, and it’s rarely a large job to correct if caught early.
Accessibility problems compound quietly. A filter buried behind three other components gets skipped at the first sign of inconvenience, and poor access is one of the most consistently cited causes of reduced output and premature failure in the field. The 60-second rule exists because it’s the difference between a maintained system and a neglected one.
- Undersizing the unit to save upfront cost, which increases run-hours and shortens component life.
- Undersized wire gauge or skipped bonding, both of which invite corrosion and voltage-related motor wear.
- Brine discharge routed below the waterline or through excessive small fittings, adding backpressure that stresses the pump over months.
- Skipping pickling before a long storage period, which lets biological growth foul the membrane even when the boat sits idle.
Pro Tip: If a system that ran fine all season suddenly underperforms after winter storage, check pickling procedure first. It’s the most common cause of a “mystery” performance drop.
A Field Note From the Workshop Floor
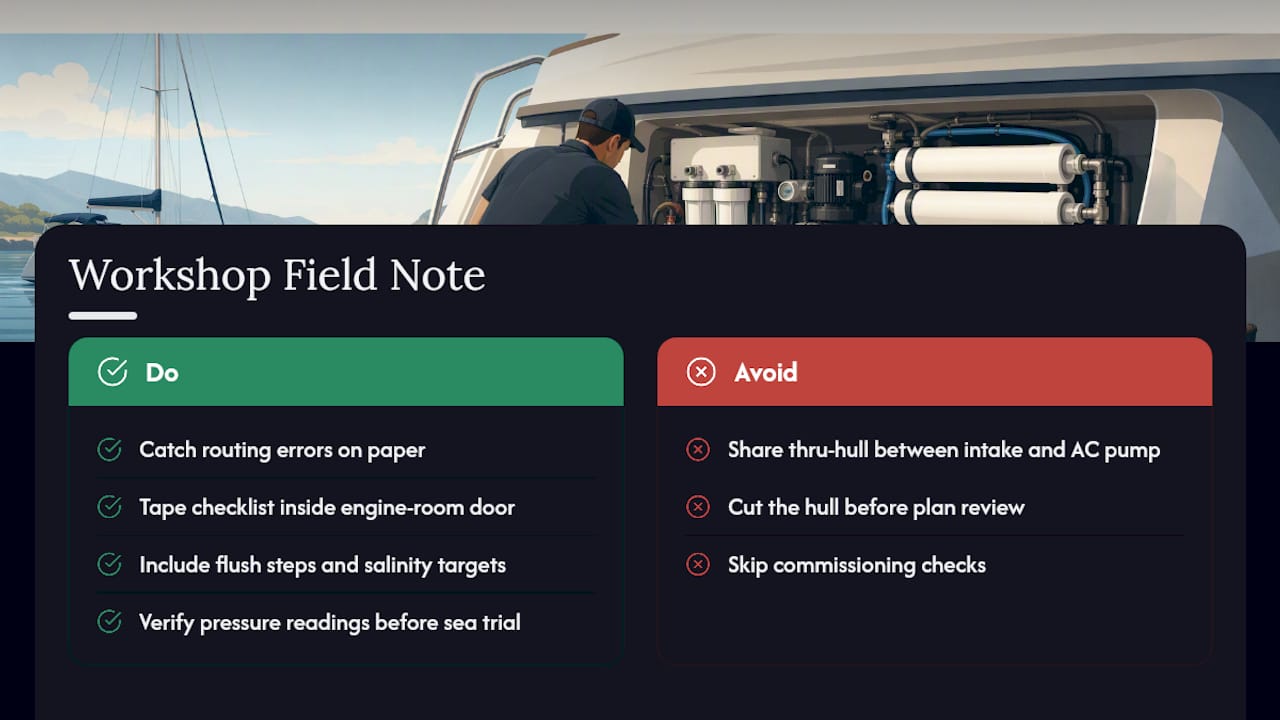
We once caught a client’s plan to run a watermaker intake off the same thru-hull as the AC pump, before a single hole got cut. Rerouting on paper took twenty minutes. Catching it after installation would have meant pulling the unit apart. Our crew keeps a laminated commissioning checklist taped inside the engine room door on every job. It covers flush steps, salinity targets, and pressure readings, so nothing gets skipped when the boat’s ready to leave the dock.
Getting Mazzamarine Involved in Your Installation
Watermaker installation touches thru-hull work, electrical integration, and often custom cabinetry to house the components cleanly, and that combination is exactly where Mazzamarine’s Florida network earns its keep. We handle the full scope: cutting and fitting dedicated intakes, running properly sized and bonded electrical circuits, building custom mounts that respect vibration and clearance requirements, and running the full commissioning checklist before we hand the boat back to you.

Choose professional installation whenever the project involves a new thru-hull, integration with existing plumbing systems, or wiring into your boat’s existing electrical panel. DIY is fine for a portable unit you can plug in and stow; anything permanent carries real risk if the bonding or intake work is done wrong. When you request an estimate, have your boat’s make and model, your typical crew size and water usage, your current electrical capacity, and any preferred watermaker brand ready to share. That’s enough for our team to scope the job accurately and give you a real number, not a placeholder. Reach out through our yacht repair services page to start that conversation today.
Sources
- Rainman watermaker installation guidelines v2.0 (PDF)
- Boat watermaker installation mistakes that can reduce performance and system life (ECHOTec)
Recommended
Text or Call 954-330-9653 Schedule Appointment
Mazza Marine Yacht Services & Refit

Fiberglass Upgrades and Damage Repair

Premium Yacht Paint/ Faux Teak

Fishing: Custom Rods, Reels,Tackle

Electrical, Electronics and Navigation

Paint, Hull and Gelcoat

Teak Decks, Wood Cabinets, Carpentry

Canvas, Enclosures and Upholstery

Mechanical, Repower and Running Gear

Plumbing, Bilge and Thru-Hulls

Welding and Custom Fabrication

Interior Refit And Past Work
Get your yacht value Estimate
"*" indicates required fields