
View Our Recent Work:

A yacht fixture replacement workflow is the systematic process of planning, executing, and verifying the swap or upgrade of onboard fixtures to preserve safety, functionality, and the timeless character of your vessel. Whether you own a 45-foot sportfish in Miami or a classic cruiser docked in Fort Lauderdale, getting this process right separates a clean, reliable boat from one plagued by intermittent failures and costly rework. The workflow complexity spans three tiers: simple swaps taking 30–45 minutes each, moderate installations with wiring or minor modifications, and complex structural refits needing 2–10 weeks. Knowing which tier you are in before you touch a single fastener is the single most important decision you will make.
What does a yacht fixture replacement workflow actually require?
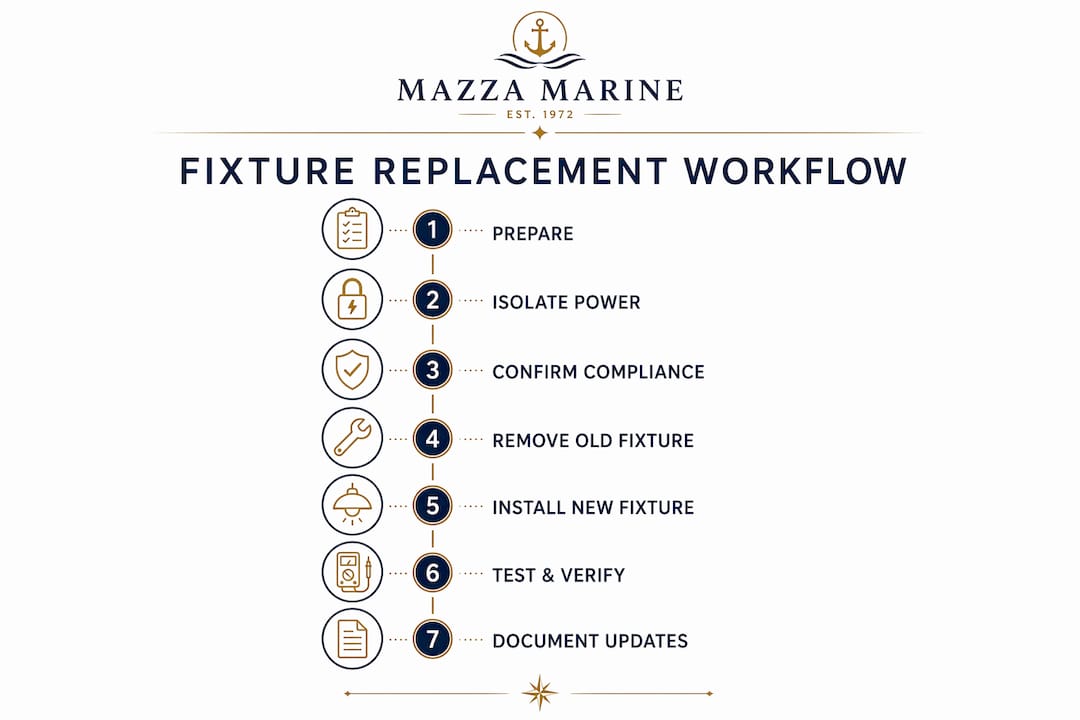
Preparation is where most owners lose time and money. A proper yacht fixture replacement workflow begins with a feasibility survey, not a shopping cart. You need to define scope before you define budget, because undiscovered complications during a yard period are the leading cause of schedule overruns and surprise invoices.
Before any work begins, gather these tools and materials:
- Multimeter for voltage and continuity checks
- Correct die crimpers matched to your terminal sizes (not generic hardware store pliers)
- Tinned copper marine-grade wire rated for the amperage and environment
- Heat shrink connectors with adhesive lining for waterproof terminations
- Hole cutting tools including nesting hole saws for non-standard openings
- Marine-grade sealant that allows future fixture removal without hull damage
Electrical safety is non-negotiable. Isolate power at the battery and DC panel before touching any wiring. Confirm isolation with your multimeter. Do not rely on a breaker alone, because a single wiring error in a marine environment can cause fire or electrocution.
Regulatory compliance also shapes your fixture selection before purchase. NEC Article 555 requires fixtures used in dock and marina environments to carry a specific listing for that environment, not just a generic wet-location rating. Most standard outdoor fixtures fail this requirement. Verify the listing on the fixture spec sheet before you order.
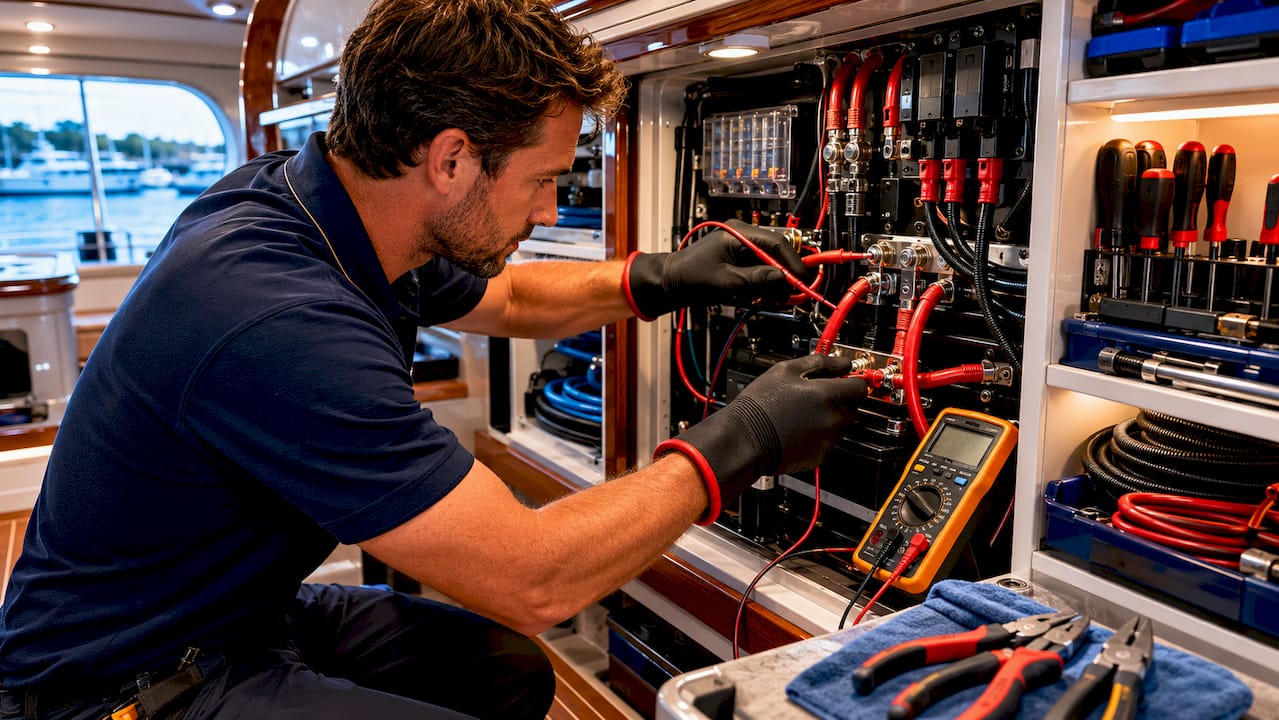
Pro Tip: During the prep phase, update your wiring diagrams and label every panel circuit you touch. Future technicians, including yourself six months from now, will thank you.
How to execute simple to moderate fixture replacements step by step
Simple and moderate replacements cover the majority of what most yacht owners face: LED lighting upgrades, navigation light swaps, deck hardware changes, and minor surface modifications. The 30–45 minute per unit budget assumes you have the right tools and a matching hole pattern. Here is the workflow that holds up in practice.
-
Confirm the hole pattern. Match the new fixture footprint to the existing cutout. A direct swap with an identical pattern eliminates hull modification entirely. If the pattern differs, use a nesting hole saw technique: seat a smaller saw inside a larger one to cut non-standard openings freehand without tool walk or hull damage.
-
Remove the old fixture carefully. Document the existing wiring connections with a photo before disconnecting anything. Note wire colors, terminal positions, and any existing heat shrink or tape. This photo saves you from guessing during reinstallation.
-
Inspect the wiring behind the fixture. Look for corrosion, chafing, or undersized wire. Tinned copper wire resists the oxidation that destroys standard copper in a marine environment. If the existing wire is not tinned copper, replace it now while the fixture is open.
-
Connect the new fixture using heat shrink connectors. Crimp with the correct die, not with pliers. Pull-test every connection. A connection that slides out under hand pressure will fail at sea.
-
Create a drip loop in the wiring. Route the wire so it dips below the fixture entry point before rising to the connection. Water follows gravity. A drip loop sends moisture away from the terminal, not into it.
-
Test voltage under full system load. Turn on pumps, washdown systems, and other high-draw equipment before reading voltage at the new fixture. Voltage drop issues hide under low-demand conditions and only appear when the system is working hard.
| Step | Action | Common mistake |
|---|---|---|
| Hole pattern check | Match footprint before ordering | Ordering first, measuring second |
| Wiring inspection | Confirm tinned copper, correct gauge | Reusing corroded or undersized wire |
| Connection method | Crimp with correct die, heat shrink | Using tape or push-in connectors |
| Drip loop | Route wire below fixture entry | Running wire straight into fixture |
| Load testing | Test with all systems active | Testing on a cold, low-draw system |
Pro Tip: Verify LED polarity before sealing the fixture. Reversed polarity on an LED produces zero light and zero error message. It simply does not work, and tracing the cause after the fixture is sealed costs far more time than a 10-second check.
Managing complex yacht fixture replacements and project timelines
Complex replacements, think deck hatches, portlights, Crestron AV systems, or VSAT upgrades, require a different mindset entirely. These are not DIY afternoons. They are managed projects with contracts, quality milestones, and sequenced trades.
Technology system upgrades like VSAT replacements and full AV migrations require yard windows of 6 or more weeks. That timeline exists because CAT6A cable installation, system commissioning, and trade coordination cannot be compressed without creating defects. Rushing a complex refit is the most expensive decision you can make.
Key elements of a well-run complex replacement project include:
- Scope definition in writing before any contract is signed, including change order protocols
- Contract terms covering warranty, deficiency correction timelines, and sea trial requirements
- Independent inspections at key milestones, not just at final delivery
- Sequencing plan that coordinates electrical, structural, and finishing trades without conflicts
- Deficiency log maintained throughout the yard period, not assembled at the end
For structural work like filling a forward deck hatch, composite vacuum infusion produces the cleanest laminate quality and avoids the resin snake trails that plague hand-layup repairs. Marine-grade sealants must be selected for flexibility and future removability. Permanent adhesives create permanent problems when the next replacement comes due.
“Independent quality control, free from yard conflicts, keeps owners informed and protects their investment at every milestone.” — Foreland Marine, Refit Project Management
A professional refit project manager handles tendering, contract negotiation, quality monitoring, deficiency tracking, and sea trial attendance. For any project exceeding two weeks in the yard, that role pays for itself in avoided rework and schedule protection.
Common mistakes, troubleshooting, and long-term fixture reliability
The most common symptom after a fixture replacement is intermittent failure. The light works at the dock, fails offshore, and works again when you return. This pattern almost always points to a voltage drop problem or a marginal connection that opens under vibration and heat.
Watch for these warning signs and root causes:
- Intermittent light failure under load: retest voltage at the fixture with pumps and washdown running simultaneously
- Polarity reversal on LEDs: produces a dead unit with no visible damage; swap the leads and retest
- Corroded connections: appear months after installation when inadequate heat shrink allows moisture in
- Chafed wiring: caused by routing wire across sharp edges without chafe protection; inspect every run
- Sealant failure: visible as water staining around the fixture base; reseal with marine-grade product rated for the surface material
Post-installation electrical testing must verify voltage at the fixture itself, not at the panel. A panel reading of 12.6 volts means nothing if the wire run drops that to 11.8 volts at the fixture under load. Document every reading in your wiring log.
For long-term reliability, regular inspection of connections and updated documentation after every service visit are the two habits that separate well-maintained yachts from problem boats. Your marine electrical systems are only as reliable as your records.
Pro Tip: Standardize fixture models across your vessel wherever possible. When every deck light uses the same Lumitec SeaBlaze X3 unit, you carry one spare that covers every position. Mixed fixture inventories mean carrying six different spares for six different failure points.
How do regulatory compliance and safety standards affect fixture replacement?
Regulatory compliance is not a formality. It is a safety requirement with real legal and insurance consequences if ignored. The NEC Article 555 standard is the clearest example: fixtures installed in dock and marina environments must carry a specific listing for that environment. A generic wet-location or outdoor rating does not satisfy this requirement.
Key compliance points every owner should know:
- Dock-environment listing: verify on the fixture spec sheet, not the product photo or marketing copy
- Shore-to-dock wiring: must follow NEC 555 installation requirements for conductor type and protection
- Fixture mounting height: affects both safety and compliance; check local marina rules alongside NEC
- Non-compliance consequences: failed insurance claims, liability exposure in the event of fire or injury, and required removal at haul-out inspection
“Most existing dock lighting fails the NEC 555 listing requirement. New installations must verify dock-environment listing before purchase.” — Portfolio Lighting, NEC Article 555 Guide
Early consultation with a qualified marine electrician or Florida yacht lighting expert before purchasing fixtures prevents the most expensive compliance mistake: buying and installing a non-compliant product that must be removed and replaced at your cost. That conversation costs nothing. The rework costs thousands.
Key Takeaways
A successful yacht fixture replacement workflow depends on matching your preparation, tools, and project management approach to the complexity tier of the job before work begins.
| Point | Details |
|---|---|
| Tier your workflow | Classify each job as simple, moderate, or complex before planning tools, timeline, or budget. |
| Prep before purchase | Confirm hole patterns, wire specs, and NEC 555 compliance before ordering any fixture. |
| Use marine-grade materials | Tinned copper wire and heat shrink connectors are required, not optional, in a marine environment. |
| Test under full load | Voltage drop problems only appear when pumps, washdowns, and other systems run simultaneously. |
| Manage complex jobs professionally | Projects exceeding two weeks in the yard need a project manager, written contracts, and independent inspections. |
What I have learned from watching owners get this wrong
I have seen the same pattern repeat itself more times than I can count. An owner replaces a set of deck lights, feels great about the job, and six months later is chasing an intermittent failure that turns into a full rewire of that circuit. The culprit is almost always the same: a connection made with the wrong tool, or a wire run that was not tested under real load conditions.
The uncomfortable truth about fixture replacement is that the physical swap is the easy part. The discipline is in the documentation, the testing, and the compliance verification. Most owners skip at least one of those three. The ones who skip all three are the ones calling for urgent repairs at the worst possible time.
I also believe the industry undervalues professional project management for complex refits. Owners see it as an added cost. In practice, a qualified project manager on a six-week yard period typically saves more than their fee in avoided change orders and deficiency corrections. The refit project management model exists because yards and owners have fundamentally different incentives. Someone needs to represent your interests independently, and that person should not be the yard itself.
For simple swaps, a confident owner with the right tools and this workflow can absolutely handle the job. For anything structural, electrical beyond a single circuit, or technology-based, bring in professionals early. The consultation costs far less than the rework.
— Jason
How Mazzamarine supports your fixture replacement projects

Mazzamarine connects Florida yacht owners with a trusted network of specialists covering every tier of fixture replacement, from a single LED swap to a full interior refit. Mino and Luigi built Mazzamarine on the belief that every owner deserves expert guidance and honest advice, not just a vendor referral. Whether you need marine repair services for a complex electrical upgrade or a complete maintenance package that keeps your vessel in peak condition year-round, Mazzamarine has the Florida partners and the hands-on experience to get it done right. Reach out today and start a relationship built on craftsmanship, trust, and a genuine love of the sea.
FAQ
What is a yacht fixture replacement workflow?
A yacht fixture replacement workflow is the structured process of planning, executing, and verifying the replacement of onboard fixtures, covering tool selection, safety protocols, wiring standards, and compliance checks. It applies to everything from LED lighting swaps to complex structural deck modifications.
How long does a simple fixture replacement take on a yacht?
Simple LED fixture swaps typically take 30–45 minutes per unit when the hole pattern matches and the correct tools are on hand. Moderate installations with wiring modifications take longer, and complex structural refits require 2–10 weeks in a yard.
What wire type is required for marine fixture installation?
Tinned copper marine-grade wire is the required standard for all onboard wiring. Standard copper wire oxidizes rapidly in a saltwater environment, creating resistance and connection failures that tinned copper resists.
Does NEC Article 555 apply to my yacht’s dock lighting?
NEC Article 555 applies to any fixture installed in a dock or marina environment and requires a specific dock-environment listing beyond a generic wet-location rating. Most standard outdoor fixtures do not meet this requirement, so verify the spec sheet before purchasing.
When should I hire a project manager for a yacht refit?
Hire a project manager for any yard period exceeding two weeks or any project involving multiple trades, structural modifications, or technology system upgrades. Independent project management protects your interests through contract negotiation, quality monitoring, and deficiency tracking.
Recommended
Text or Call 954-330-9653 Schedule Appointment
Mazza Marine Yacht Services & Refit

Fiberglass Upgrades and Damage Repair

Premium Yacht Paint/ Faux Teak

Fishing: Custom Rods, Reels,Tackle

Electrical, Electronics and Navigation

Paint, Hull and Gelcoat

Teak Decks, Wood Cabinets, Carpentry

Canvas, Enclosures and Upholstery

Mechanical, Repower and Running Gear

Plumbing, Bilge and Thru-Hulls

Welding and Custom Fabrication

Interior Refit And Past Work
Get your yacht value Estimate
"*" indicates required fields